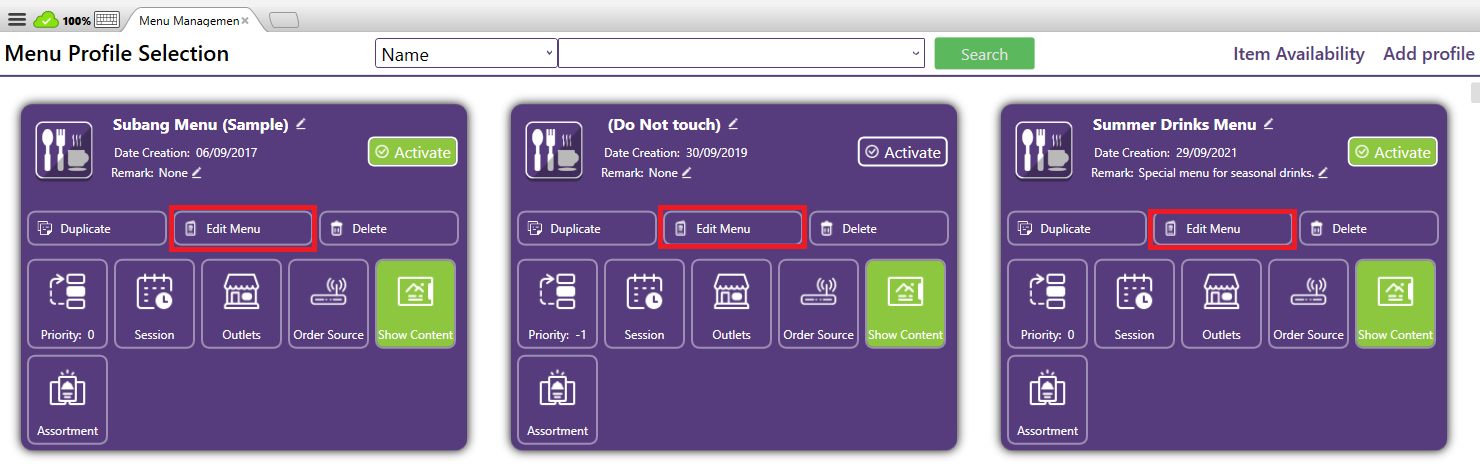
How to Edit a Menu Profile?
The Edit Menu Profile function allows you to modify the existing settings, items, or configurations within a specific menu profile.
It’s used when you need to update what items are available, or change the profile’s details
It’s used when you need to update what items are available, or change the profile’s details
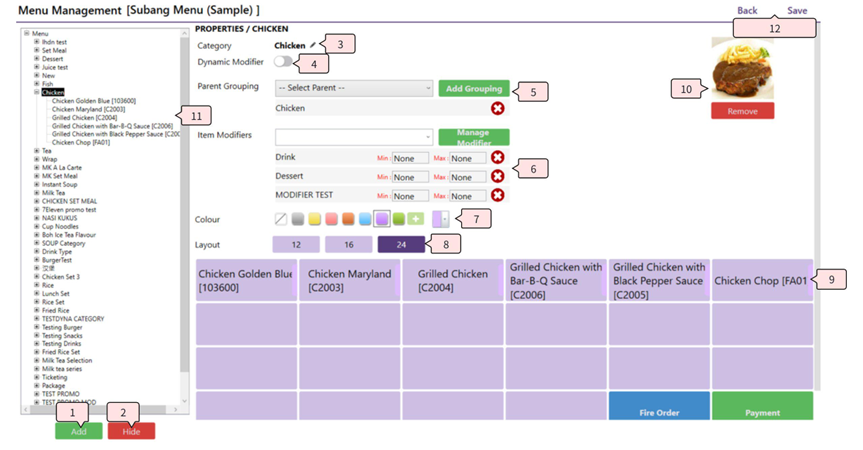
- Add: Add menu item by category / menu item into menu profile
- Add Category: In the add menu item by Category dialog, users can use the Search field to find specific category name. After ticking the required category, proceed to press Add to direct add selected category into menu with all the items in it.
- The category list will show all the categories that hadn't been added into menu profile only.
Search using "Milk" - Added category will add at last category by default
- Additionally, by using the Add Menu Item, it will proceed to select menu item manually with the category selected. Similar with add category, tick the item and press Add to add those item from selected category into menu profile.
"Dynamic item list" will show all the Dynamic Item from the category
- The category list will show all the categories that hadn't been added into menu profile only.
- Add Menu item: before proceeding to add menu item, users need to select category in the Menu Profile first. The pop out will show all the items that hadn't been added into the category only. By ticking the item and press Add to add those selected menu items into menu profile.
- There is a function to be able to add items from others category into category selected.
- Select item(s) from another category from the dropdown category list
- There is a function to be able to add items from others category into category selected.
- Hide: Hide the menu category / menu item from the menu profile
- Before hiding the category/item, select to highlight the category/item from the menu list.
- Users can multiple select to hide multiple categories/items.
- After selecting and pressing Hide, a confirmation box will appear. Press Yes to proceed or press No to revert the process.
- After the category/item is hidden, users will still able to use the Add button to re-add the category/item back into the menu.
- Before hiding the category/item, select to highlight the category/item from the menu list.
- Display name: The field is the current display name for the category which is the category name from item.
- The field is designed for users to be able to edit the display name for the category in the menu.
- After selecting the category and clicking on the field to start editing, after editing press Save to store the changes.
- The field is designed for users to be able to edit the display name for the category in the menu.
- Dynamic modifier: Indicator to enable / disable the display of dynamic item in the category. By default, it will be enabled when the category is added with Dynamic Item.
- Use case: The setup of Dynamic Modifier item is designed for items that support multiple variations (By Size, By Flavour, etc).
Example: Milk Tea comes with Milk Tea -Regular, Milk Tea -Large, Milk Tea -Hot. - In order to setup a set of dynamic modifier items required 1 base item and multiple variations of items as different selections for it. This setup is normally used under use cases for items with multiple variations/selections such as Drink with Hot / Cold, Ice Cream with Vanilla / Chocolate / Strawberry, Chicken set with Ori/Spicy, etc.
- Sample configuration: in Xilnex, the system will use Group and Model field from item to generate as Dynamic Item.
- There will always be a base item with a Group name and empty Model value.
- For additional dynamic modifier options, it will need to be created with the same Group name to let the system detect it as same item series with the base item and with Model value as the selection name in menu.
Create multiple items with different model name - By selecting the Dynamic Base Item, the item details will display all the added variations item with different Model names.
Model will display in both menu management and FNB POS. Select different Type will change the item in the cart.
- When the Dynamic Modifier flag is enabled for the category, in menu and FNB POS will display with the selection of dynamic item for the items.
- When the Dynamic Modifier flag is disabled for the category, in menu and FNB POS will display the item as normal item only.
- Use case: The setup of Dynamic Modifier item is designed for items that support multiple variations (By Size, By Flavour, etc).
- Parent grouping: Additional grouping value as an additional layer to group multiple categories into 1/multiple group and used when menu display by Group instead of category.
- Before assigning any grouping value to the category, users need to press Add Grouping to start creating grouping value first.
- After dialog above is prompted, key in the Group name in the field and press Add to add into menu and auto assign to category selected.
- In order to add another category, start by selecting another category and select from the dropdown list for Select Parent and choose to proceed.
- In order to select by Group in FNB POS, need to select from the side menu from Cart
The category will display options under the selected group. Other is meant for show other categories without group value
- Before assigning any grouping value to the category, users need to press Add Grouping to start creating grouping value first.
- Item Modifiers: Allows businesses to enhance menu items with additional choices, customizations, or add-ons. Unlike Dynamic Items (which define fixed variations such as size or type), Modifiers give customers the flexibility to personalize their order by selecting from a list of extra options (add as individual item)
- In order to create new modifiers, press Manage Modifier to start creation of new modifiers.
- On the management modifier page, press Add > Add New Modifier to add new modifier by tick Show More and search and select the category from the list and fill in the Modifier label.
- Press OK button to add all the items from category selected as modifier directly. Additionally, users can press Add Menu Item to manually select which item to add into the new modifier label.
- In order to add additional items into modifier list, select one of the modifier labels and press Add > Add Menu Item and select Category from the drop list.
- Use Hide button to hide those unused modifier labels from the list. Hidden modifier label will not be recoverable.
- Use the Search function on top to search modifier by name.
- Users can drag and drop to arrange the sequence of the modifier label.
- Edit the modifier label by clicking on the name of label and edit and enter to store the name.
- Additional configuration for modifier item:
- Required: Act as compulsory option in modifier selection to enforce users need to select the modifier. (e,g, Sugar level / Ice level for Milktea)
- Defaults: Only 1 of the modifier items can be selected in the modifier list, act as the default option in the modifier label, the option will not display in the menu. (e,g, Normal sugar for Sugar level option, Normal Ice for Ice level option)
- Toggle: When enabled, the modifier item will become toggle button between two states, toggle on as Add, toggle off as remove / deselect. Normally used when the modifier can only add as 1 quantity. (e,g, Less spicy for Spicy level)
- Default: Default quantity of the modifier item to add when the menu item with the modifier label is added in FNB POS. (e,g, Free Ice Lemon Tea with Lunch Combo option)
- Color: The displayed sideline color of the modifier item in the menu is easier for users to differentiate between multiple modifier items.
- In order to apply changes in the menu profile, press Save to apply the changes.
Xilnex will highlight the items with the similar name - On the management modifier page, press Add > Add New Modifier to add new modifier by tick Show More and search and select the category from the list and fill in the Modifier label.
- After adding a new modifier label, select the modifier from the drop down list of Item Modifiers to add into the category selected.
- Min and Max values are to control the minimum quantity and maximum quantity for the modifier value.
- Min value will be used to control minimum quantity to be selected to complete order. (e,g, Select 2 sides for Combo set)
- Max value will be used to limit the maximum quantity that can be selected for the modifier label. (e,g, Maximum 4 toppings can be added for the Drinks)
- Min and Max control can be implemented together for each modifier label individually.
- If users want to remove the modifier label selection from the category, press the X icon to remove the modifier from the category. (The modifier will still be stored in the Item Modifiers list)
- Colour: Configuration to configure the line/box color of the item in the FNB POS menu layout.
- The colour can be configured at Category level by selecting the category or at Item level by selecting the item in the category. The item color can be configured differently for each item individually.
- In order to show Full Colour for menu button, go to System Configuration > Sales > All Outlets > FnB Point of Sales > Enable the "Show Full Color of Menu Button"
- Layout: The setting is to adjust the display grid size of the menu button in FNB POS.
- The grid size will be changed in Menu management and FNB POS when the Layout setting is changed.
- Menu button: What you see in this section will be the same layout of the category / item in the FNB POS.
- The display will be impacted by the Button layout, Button Color.
- Users can drag and drop the button to adjust the button arrangement.
- Image button: Button to upload the image for Category and Menu item. The image uploaded will be reflected on the Live series platform.
- Category and item listing: Users can check added category and item from the list and can adjust the position for both Category and Item.
Item position will impact the custom position setting at 9.Menu button- In order to display the Item Code for the menu item, users need to configure the setting as in System Configuration > Sales > All Outlets > FnB Point of Sale: "Show Item Code on Menu". When the setting is enabled , the item code will be displayed in menu management and FNB POS.
- In order to display the Item Code for the menu item, users need to configure the setting as in System Configuration > Sales > All Outlets > FnB Point of Sale: "Show Item Code on Menu". When the setting is enabled , the item code will be displayed in menu management and FNB POS.
- Back and Save button:
- Back The Back button allows the user to return to the Menu Selection Page without applying any new changes made in the current session. It is useful if the user wants to exit the current screen and review or switch to another menu without committing updates.
- Save The Save button confirms and applies all the modifications performed on the menu or item setup. Once saved, these updates will be reflected in the system and synchronized across the relevant outlets or order sources (depending on configuration).
⚠️ Note: Unsaved changes will not be retained when using Back.✅ Always click Save after making edits to ensure that changes are successfully stored.
Related Articles
How to change Menu Name and Remarks?
The Name & Remark displayed in Menu Management allows users to modify the menu profile name and add remarks for internal reference. How It Works: Edit Name Click the display name of the menu profile and edit and press Enter to save the name to the ...What is Menu Management in Xilnex Classic POS?
What is Menu Management in Xilnex Classic POS? The Menu Management function provides a centralized and flexible platform to design, organize, and maintain your product catalog across all sales channels. It is built to streamline menu setup, ensure ...How to Add a Menu Profile?
A Menu Profile refers to a specific set or version of a restaurant’s menu that is designed for a particular outlet, channel, or time period. It helps restaurants organize and control which food and drink items are available, where they appear, and ...How to Delete a Menu Profile?
The Delete Menu button will permanently remove the selected menu profile from the system. A menu profile typically contains menu items, modifiers, outlet and order source controls, and session configurations. Key Notes: Once deleted, the profile and ...How to Duplicate a Menu Profile?
The Duplicate Profile function allows users to quickly create a new menu profile by copying an existing one. This is especially useful when multiple outlets or locations share similar menus but require slight adjustments (e.g., pricing, item ...
Recent Articles
Managing Lark User Email Mapping in Xilnex for Lark
Overview The Users card matches each Xilnex user to their Lark account by email. This is what lets features like Permission Approvals and Document Approvals deliver Lark cards to the right person. This article covers how to review the mapping and fix ...E-Wallet and Credit Card Payment - Recheck Status & Force Complete
This guide walks you through what to do when a payment goes through on the terminal or e-wallet, but Classic POS fails to commit sales. When Does This Happen? During payment, Classic POS will show a "Connecting to Ewallet party..." or processing ...E-Journal for BIR Compliance (Philippines)
Overview The E-Journal feature generates a .txt file that complies with BIR (Bureau of Internal Revenue) requirements in the Philippines. This feature is available only for the Philippines COM. Users from other countries' COMs will not be able to ...Disconnecting or Reconnecting Xilnex for Lark
This article covers how to disable a template, fully disconnect the integration from Lark, and reconnect it again. Disable a Template Turning a base off only stops that one base, everything else keeps syncing, and none of your existing data in Lark ...Creating a Base in Xilnex for Lark
Overview This article walks you through creating a base for a template, giving end users access to it in Lark, and verifying data is syncing correctly. Xilnex for Lark must already be connected before you start. If the Templates card isn't accessible ...
Popular Articles
Basic - How to create a voucher-coupon
Voucher and coupon definition Voucher can be generated in bulk and can be used once Coupon can only be created one at a time (reusable code) and can be use multiple times Pre-voucher / coupon setup There are 2 things need to be prepared before we can ...Understanding DuitNow QR Payment in ClassicPOS
Introduction This document introduces the DuitNow QR payment feature available in the Xilnex Retail POS, enabling merchants to accept payments conveniently through Malaysia's national QR payment standard. The integration of DuitNowQR simplifies the ...Intermediate - How to Configure and Use Approval Settings in Purchase Orders (PO)
1.0 What is approval setting In general, "approval setting" refers to the configuration or process by which a request, action, or change must be reviewed and approved before it proceeds. The term is often used in business, software applications, and ...Buy 2 for Special Price Promotion
Use Case: Stock clearance, seasonal offers, or spotlight products. From the sample screenshot above, this promotion requires 2 items to trigger. If only 1 Milk Tea is added to the sales list, no discount will apply since the condition of 2 items is ...Creating Delivery Type for Sales in Classic POS
How to Create Delivery Type 1. Access to the [System Configuration] 2. Select the [Sales] section 3. In the [All Outlets] tab, look for the 'Delivery Type' 4. Click on the [Configure] In the Delivery Type Setup form: 1. Enter the Delivery Type. 2. ...