Xilnex Tour Management
Overview
The Tour Guide Module is designed to support tourism ticketing and commission tracking. It allows businesses to manage tour companies, tour guides, tour sessions, and commission payouts, with full integration into the POS for sales tracking.
Module Activation
Before using the Tour Guide Module, the user must enable the plugin:
Portal → Plugin → Tour Management
Once enabled, the Tour Management module will be available for setup and configuration.
Tour Management Setup
There are two setup steps in Tour Management:
Step 1: Create Tour Company
Users must first create a Tour Company.
Tour Company Settings include:
- Outlet Commission Setting: Commission rate per outlet
- Default Commission Setting: Applied to all outlets by default
Note: A payment-method-based commission calculation is planned and will be introduced in a future interface update. (Currently will insert data on backend and maintain it by engineer)
Step 2: Create Tour Guide
Next, users create Tour Guides by filling in the required information.
Important Notes:
- There is no direct linkage between Tour Guides and Tour Companies.
- This design allows a tour guide to work with multiple tour companies.
Data Sync to POS (Classic)
After setup, data will sync to the POS (Classic), enabling:
- Tour Session Module
- Tour Session List (Retail POS)
- Retail Tourism Button in POS
Tour Session Management (Interface Improvement In Progress)
Tour Sessions are created in the Ticket System to register arrivals for the day.
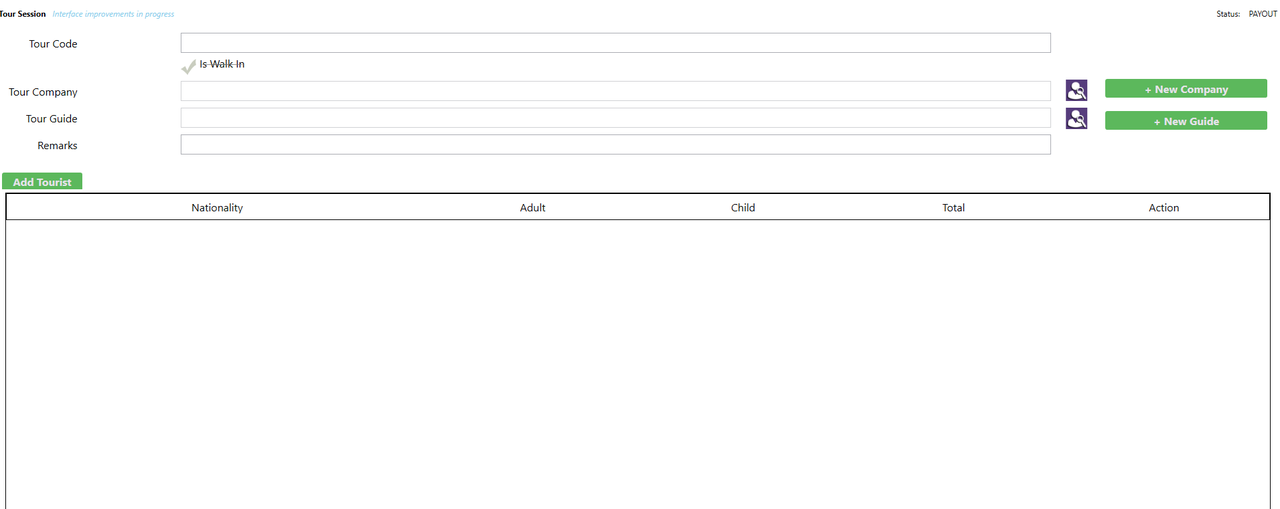
Creating a Tour Session
When creating a tour session, the user will:
- Enter a Tour Session Code
- Select a Tour Company
- Select a Tour Guide
- Color Tagging (Coming Soon)
- Optionally flag the session as Walk-in
Walk-in flags allow reporting on walk-in tours and walk-in customers by date.
Tour Session Create simplified Tour company/ Tour guide (Temporary Remove)
Tour Sessions able to create simplified tour company/ tour guide

Creating a simplified Tour company/ Tour guide
- Only will fill in compulsory field
- Other information will need to be updated on the portal
Tourist Registration

After selecting the tour company, users can register tourists for the session:
- Enter number of tourists
- Select nationality
- Specify adult and child count
After saving, the system will:
- Generate and print a QR code for the tour session
The QR code is used at the POS during sales.
Tour Session Status
Each tour session has one of the following statuses:
- OPEN – Tour session is active and sales can be attached
- COMPLETE – Tour session has ended. (In backend it will calculate based on commission setting for all the sales that flag the sales under this tour session)
- PAYOUT – Commission for the session has been paid
POS Integration – Retail Tourism
In the POS, a Retail Tourism button is available.
When selected:
- Cashier can scan the tour session QR code, or
- Manually select a tour session with OPEN status
All sales performed will be:
- Tagged to the selected tour session
Commission Calculation & Payout
Commission is calculated during payout based on:
- Total sales linked to the tour session
- Outlet commission setting
- Payment method
Example:
- Outlet commission: 15%
- Commission = Total Tour Session Sales × 15% (Based on configuration set)
- Non Cash = Total Tour Session Sales x 1% (Based on configuration set) (Currently there is no UI for this yet only insert by backend)
- Total = Comission - Non Cash
Completing & Paying Out a Tour Session
After payment to the tour guide:
- User selects the tour session
- Performs Complete & Payout action
- Support bulk action
Once payout is completed:
- The session status updates to PAYOUT
- All related sales are finalized
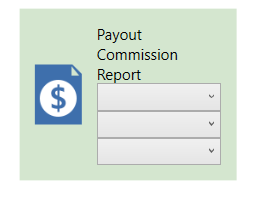
Reporting
After payout, commission details can be printed via:
Report Printing → Payout Commission Report
Report Filters
The Payout Commission Report includes three filters:
- Tour Company Code (Compulsory)
- User must select a tour company code to generate the report.
- Outlet (Optional)
- If not selected, the system will automatically include all outlets.
- Tour Guide (Optional)
- If not selected, the system will automatically include all tour guides.
Printing Format Configuration
Users can customize printing formats as follows:
Tour Session QR Format
System Configuration → Current Outlet → Tour Session QR
Payout Commission Report Format
System Configuration → Current Outlet → Payout Commission Report
Related Articles
What is Menu Management in Xilnex Classic POS?
What is Menu Management in Xilnex Classic POS? The Menu Management function provides a centralized and flexible platform to design, organize, and maintain your product catalog across all sales channels. It is built to streamline menu setup, ensure ...Enabling Staging Mode in Xilnex Classic
Introduction The Staging Mode function provides a controlled environment for testing, configuration, and validation before applying changes to the live production system. It allows businesses to experiment with settings, workflows, and data without ...Xilnex Classic BIR Discount Guidelines (Philippines)
1. Overview The BIR Discount feature supports statutory discounts for eligible customers in the Philippines. This feature is currently: Available only for Philippines companies Supported only in the F&B POS for now Configured through Xilnex Classic ...Setting Up Credit Card Terminal in Xilnex ClassicPOS
Introduction This guide explains how to configure and integrate credit card terminals with the POS system. The integration ensures smooth communication between the POS and payment devices, helping businesses process transactions securely and ...User guide to configure biometric with ZK Finger Print
Introduction The Xilnex system supports biometric authentication using fingerprint scanners to enhance security and streamline employee login processes. Our platform now supports both ZK Finger Print and Digital Persona fingerprint scanner devices, ...
Recent Articles
Managing Lark User Email Mapping in Xilnex for Lark
Overview The Users card matches each Xilnex user to their Lark account by email. This is what lets features like Permission Approvals and Document Approvals deliver Lark cards to the right person. This article covers how to review the mapping and fix ...E-Wallet and Credit Card Payment - Recheck Status & Force Complete
This guide walks you through what to do when a payment goes through on the terminal or e-wallet, but Classic POS fails to commit sales. When Does This Happen? During payment, Classic POS will show a "Connecting to Ewallet party..." or processing ...E-Journal for BIR Compliance (Philippines)
Overview The E-Journal feature generates a .txt file that complies with BIR (Bureau of Internal Revenue) requirements in the Philippines. This feature is available only for the Philippines COM. Users from other countries' COMs will not be able to ...Disconnecting or Reconnecting Xilnex for Lark
This article covers how to disable a template, fully disconnect the integration from Lark, and reconnect it again. Disable a Template Turning a base off only stops that one base, everything else keeps syncing, and none of your existing data in Lark ...Creating a Base in Xilnex for Lark
Overview This article walks you through creating a base for a template, giving end users access to it in Lark, and verifying data is syncing correctly. Xilnex for Lark must already be connected before you start. If the Templates card isn't accessible ...
Popular Articles
Basic - How to create a voucher-coupon
Voucher and coupon definition Voucher can be generated in bulk and can be used once Coupon can only be created one at a time (reusable code) and can be use multiple times Pre-voucher / coupon setup There are 2 things need to be prepared before we can ...Understanding DuitNow QR Payment in ClassicPOS
Introduction This document introduces the DuitNow QR payment feature available in the Xilnex Retail POS, enabling merchants to accept payments conveniently through Malaysia's national QR payment standard. The integration of DuitNowQR simplifies the ...Intermediate - How to Configure and Use Approval Settings in Purchase Orders (PO)
1.0 What is approval setting In general, "approval setting" refers to the configuration or process by which a request, action, or change must be reviewed and approved before it proceeds. The term is often used in business, software applications, and ...Buy 2 for Special Price Promotion
Use Case: Stock clearance, seasonal offers, or spotlight products. From the sample screenshot above, this promotion requires 2 items to trigger. If only 1 Milk Tea is added to the sales list, no discount will apply since the condition of 2 items is ...Creating Delivery Type for Sales in Classic POS
How to Create Delivery Type 1. Access to the [System Configuration] 2. Select the [Sales] section 3. In the [All Outlets] tab, look for the 'Delivery Type' 4. Click on the [Configure] In the Delivery Type Setup form: 1. Enter the Delivery Type. 2. ...