Selecting and Changing a Store in Xilnex Portal
Store Selection
After logging in, a list of permitted store will appear. Select an store to proceed.
Mark as Default Store
Marking an outlet as the default store will automatically load it after log in, skipping the store selection screen.
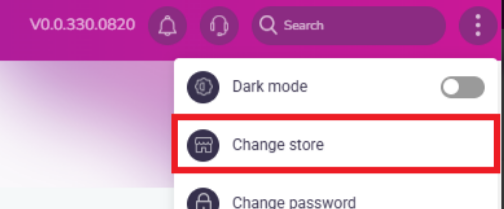
Changing the Store
The active store can be switched at any time using the Change Store option in the kebab menu (top right).
The active store can be switched at any time using the Change Store option in the kebab menu (top right).
When changing stores, a confirmation message will appear, reminding users to save any progress or documents before continuing.
After confirmation, the store selection form will reappear, displaying all outlets the account is permitted to access.
Related Articles
Deleting a Store in Xilnex Portal
How to Delete a Store in Xilnex Portal 1. To delete a store, go to [System Configuration] in the menu bar and select [Store Management]. 2. Select the store you want to delete. 3. Select [DELETE]. Important Note: Once a store is deleted, this action ...Updating Store Details in Xilnex Portal
How to Update Store Details in Xilnex Portal 1. To update store details, go to [System Configuration] in the menu bar and select [Store Management]. 2. Double-click the store or select more and click [EDIT]. 3. The existing store information will ...Creating a New Store in Xilnex Portal
How to Create a New Store in Xilnex Portal To create, edit, or delete a store, go to [System Configuration] in the menu bar and select [Store Management]. The system will display a list of stores accessible to your account. Create a New Store 1. ...Importing Store Details in Xilnex Portal
Overview The Import Store Details in Xilnex Portal is a function that allows users to import store data in bulk using CSV files. Users have the option to import the store details either With updating the existing records or Without updating the ...Downloading Store Sample CSV Template File in Xilnex Portal
Overview The Download Store Sample CSV Template File feature in Store Management Import and Log allows staff to download a sample template, containing all necessary fields and proper format for importing data into the system. Preparing imported files ...
Recent Articles
Delivery Platform Packaging Fee Configuration
Packaging Fee Packaging Fee is an additional charge imposed by the restaurant/merchant to cover takeaway and delivery packaging materials such as containers, cups, lids, bags, cutlery, seals, etc. For food delivery platforms: Foodpanda Foodpanda ...How to use replenishment module
Introduction In Xilnex, the Replenishment Module is designed to streamline and automate the stock allocation process across outlets, ensuring optimal distribution and improved operational efficiency. Key capabilities include: Location Ranking for ...Staff Meal Integration
Staff Meal Integration User Guideline Introduction Staff Meal Integration allows F&B POS to deduct staff meal credit / wallet balance directly from a third-party staff management system when staff purchase meals. This feature is currently supported ...Cancel Print of Full Tax Invoice
Overview In Classic POS, there is a feature called Print Full Tax Invoice, which allows users to generate a full tax invoice for a completed sale. The system must maintain an auditable log whenever a Full Tax Invoice is cancelled. This guideline ...Xilnex API Guide for 3rd party
1. Objective The objective of this API guide is to provide a clear reference for developers and integration partners on how to utilize the Xilnex APIs to establish communication with the Xilnex system. The guide outlines the available endpoints, ...
Popular Articles
Basic - How to create a voucher-coupon
Voucher and coupon definition Voucher can be generated in bulk and can be used once Coupon can only be created one at a time (reusable code) and can be use multiple times Pre-voucher / coupon setup There are 2 things need to be prepared before we can ...Understanding DuitNow QR Payment in ClassicPOS
Introduction This document introduces the DuitNow QR payment feature available in the Xilnex Retail POS, enabling merchants to accept payments conveniently through Malaysia's national QR payment standard. The integration of DuitNowQR simplifies the ...Basic - How to change custom cost to another branch that don’t have custom cost
Change custom cost to another branch that don’t have custom cost 1. Get the item list from the location with custom cost (Item Code, Name, Custom Cost) 2. Make sure the Show Location Price are selected 3. Export the item list in Excel 4. The file ...Intermediate - How to Bill & Post to Sales from Transfer Note
1.0 Purpose A bill is required from transfer note when an inventory transfer involves financial transactions, cost allocation, or compliance with tax and accounting regulations. It is used when stock is moved between outlets that operate as separate ...Basic - How to enable E-Receipt Portal and QR Code Setup on Printing format in Xilnex
Enable E-Receipt Portal Enable the E-receipt functionality Once Enabled, you will be getting the E-Receipt portal link Continue under Theme & Styling, enabled for the E-Invoice (LHDN) You can customize the look and feel of the E-Receipt portal ...