Xilnex-AutoCount - Account Code Mapping
Account Code Mapping connects Xilnex transaction components (sales types, item categories, payment methods) to AutoCount GL accounts and payment codes. This ensures transactions post to the correct financial accounts.
What Is Account Code Mapping?
Account Code Mapping establishes the relationship between:
- Xilnex transaction attributes (e.g., "Retail sale", "Coffee category", "Cash payment")
- AutoCount GL codes (e.g., "500-5000 Coffee Sales", "310-1000 Cash Account")
Without mapping, the system doesn't know which GL account to use when posting.
Core Mapping Types by Module
Sales Module Mappings
Mapping Type | Used For | Example |
Sales Account | Main revenue GL by sales type and item category | Food Sales → 500-5000 |
Sales Rounding Account | Rounding differences in sales | Rounding Adjustment → 550-0000 |
Sales Header Discount Account | Bill-level discounts (e.g., "20% off entire purchase") | Discount Allowed → 520-0000 |
Sales Item Discount Account | Item-level discounts (e.g., "Buy 1 Get 1") | Line Item Discount → 150-0000 |
Purchase Module Mappings
Mapping Type | Used For | Example |
Purchase Account | Product purchase GL by receive type and item category | Accessories Purchase → 610-0000 |
Purchase Invoice Variance Account | Price/rounding differences between GRN and invoice | Purchase Variance → 630-0000 |
Purchase Tax Variance Account | Tax differences between GRN and invoice | Tax Variance → 640-0000 |
Payment Module Mappings
Mapping Type | Used For | Example |
Payment Method Code | Payment method (Cash, Card, E-Wallet, Voucher) to AutoCount journal type | Cash → CASH (320-0000) |
Card Type | Specific card (Visa, MasterCard) | Visa → VIS (310-1000) |
E-Wallet / Gateway | Specific e-wallet or payment gateway | GrabPay → GRABPAY (310-1000) |
Step-by-Step Guide
Creating a Sales Account Mapping
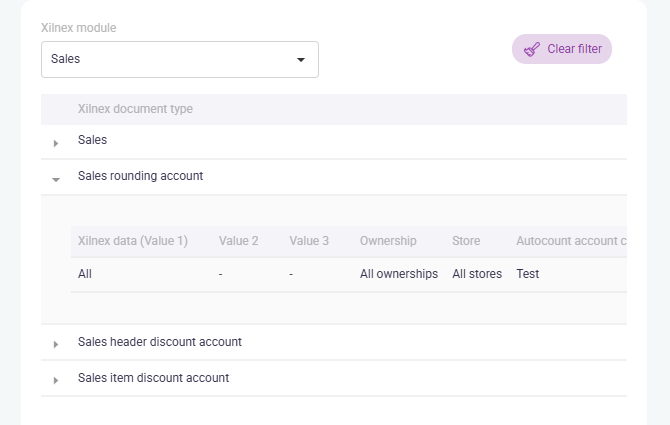
- Go to Integration > AutoCount > Account Code
- Select module: Sales
- Click "Add data" button
- In the form, fill:
- Data (Value 1): Sales Type
- Value 2: Item Grouping Method
- Value 3: Category Value
- Ownership: All ownerships
- Store: All stores
- AutoCount account code: GL code from AutoCount
- Click "Save"
Creating a Payment Method Mapping
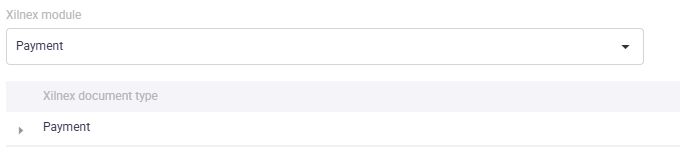
- Go to Integration > AutoCount > Account Code
- Select module: Payment (or Cash Sales → Payment sub-section)
- Click "Add data" button
- In the form, fill:
- Data (Value 1): Payment Method
- Value 2: Only when applicable
- Value 3: Only when applicable
- Ownership: All ownerships
- Store: All stores
- AutoCount account code: Payment Method Code from AutoCount
- Click "Save"
Creating a Purchase Account Mapping
- Go to Integration > AutoCount > Account Code
- Select module: Purchase
- Click "Add data" button
- In the form, fill:
- Data (Value 1): Receive type
- Value 2: Item grouping method
- Value 3: Accessories
- Ownership: All ownerships
- Store: All stores
- AutoCount account code: GL code from AutoCount
- Click "Save"
Creating a Discount Account Mapping
- Go to Integration > AutoCount > Account Code
- Select module: Sales
- Click "More" at the left to expand options
- Select "Sales header discount account"
- Click "Add data"
- In the form, fill:
- Data (Value 1): All or Specific sales type
- Value 2: When applicable
- Value 3: When applicable
- Ownership: All ownerships
- Store: All stores
- AutoCount account code: GL code from AutoCount
- Click "Save"
Tips for Accurate Mapping
- Get GL codes from AutoCount: Open AutoCount → File > G/L > Account Maintenance to see your Chart of Accounts.
- Get Payment codes from AutoCount: Open AutoCount → General > Maintenance > Payment Method Maintenance to see available payment codes.
- Map hierarchically: Start broad (e.g., "All sales types" → main GL), then narrow (e.g., "Retail Coffee" → specific GL) for detailed reporting.
- Test one mapping: Create one mapping, run a test post, verify it worked, then add more.
Related Articles
Xilnex-AutoCount - Portal Configurations
All integration rules and configurations are managed through the Xilnex Web Portal. This guide walks you through accessing the portal and introduces the three core configuration areas. Accessing the Xilnex Web Portal: Open your web browser and ...Xilnex-AutoCount - What Gets Synchronized?
The Xilnex–AutoCount integration establishes a seamless, automated data exchange between your Xilnex Retail Management System and AutoCount Accounting System, so your operational transactions are automatically reflected in your financial records. 1. ...Xilnex-AutoCount - Posting Cash Sales
Cash Sales posting consolidates daily retail POS transactions and posts them to AutoCount Cash Book Entry, providing accurate cash-flow visibility and daily revenue tracking. What Is Cash Sales Posting? Cash Sales posting: Consolidates all retail ...Xilnex-AutoCount - Troubleshooting Common Posting Errors
Cash Sales Error Cause Solution "Missing mapping" A GL account or payment method wasn't mapped Go to Account Code, add the missing mapping, re-post "No data generated" No transactions in the date range Verify date range is correct and POS has ...Xilnex-AutoCount - Document Field Mapping
Document Field Mapping specifies how Xilnex fields appear in AutoCount document fields. This includes header-level data (like Document Number and Customer) and detail-level data (like Item Description and Tax Code). What Is Document Field Mapping? ...
Recent Articles
Managing Lark User Email Mapping in Xilnex for Lark
Overview The Users card matches each Xilnex user to their Lark account by email. This is what lets features like Permission Approvals and Document Approvals deliver Lark cards to the right person. This article covers how to review the mapping and fix ...E-Wallet and Credit Card Payment - Recheck Status & Force Complete
This guide walks you through what to do when a payment goes through on the terminal or e-wallet, but Classic POS fails to commit sales. When Does This Happen? During payment, Classic POS will show a "Connecting to Ewallet party..." or processing ...E-Journal for BIR Compliance (Philippines)
Overview The E-Journal feature generates a .txt file that complies with BIR (Bureau of Internal Revenue) requirements in the Philippines. This feature is available only for the Philippines COM. Users from other countries' COMs will not be able to ...Disconnecting or Reconnecting Xilnex for Lark
This article covers how to disable a template, fully disconnect the integration from Lark, and reconnect it again. Disable a Template Turning a base off only stops that one base, everything else keeps syncing, and none of your existing data in Lark ...Creating a Base in Xilnex for Lark
Overview This article walks you through creating a base for a template, giving end users access to it in Lark, and verifying data is syncing correctly. Xilnex for Lark must already be connected before you start. If the Templates card isn't accessible ...
Popular Articles
Basic - How to create a voucher-coupon
Voucher and coupon definition Voucher can be generated in bulk and can be used once Coupon can only be created one at a time (reusable code) and can be use multiple times Pre-voucher / coupon setup There are 2 things need to be prepared before we can ...Understanding DuitNow QR Payment in ClassicPOS
Introduction This document introduces the DuitNow QR payment feature available in the Xilnex Retail POS, enabling merchants to accept payments conveniently through Malaysia's national QR payment standard. The integration of DuitNowQR simplifies the ...Intermediate - How to Configure and Use Approval Settings in Purchase Orders (PO)
1.0 What is approval setting In general, "approval setting" refers to the configuration or process by which a request, action, or change must be reviewed and approved before it proceeds. The term is often used in business, software applications, and ...Buy 2 for Special Price Promotion
Use Case: Stock clearance, seasonal offers, or spotlight products. From the sample screenshot above, this promotion requires 2 items to trigger. If only 1 Milk Tea is added to the sales list, no discount will apply since the condition of 2 items is ...Creating Delivery Type for Sales in Classic POS
How to Create Delivery Type 1. Access to the [System Configuration] 2. Select the [Sales] section 3. In the [All Outlets] tab, look for the 'Delivery Type' 4. Click on the [Configure] In the Delivery Type Setup form: 1. Enter the Delivery Type. 2. ...