Integrating with Xilnex: Event Triggers & Webhook Configuration
Overview
Xilnex Event Hub is an integration framework that enables your system to automatically dispatch real-time notifications to external applications whenever a defined business action occurs — such as completing a sale, creating a client, or processing a payment.
The setup is built on two core components:
- Event Trigger — defines which business event to monitor
- Webhook Configuration — defines where to route the notification when that event fires
Prerequisites
Before proceeding, ensure you have:
- Active login credentials to the Xilnex Portal
- The API endpoint URL of the receiving external system
- A webhook secret key (provided by your IT or integration team)
Event Hub Setup Flow
- Log in to Xilnex Portal
- ↓
- Navigate to Xilnex Event Hub
- ↓
- Create an Event Trigger ← Define which event to monitor
- ↓
- Create a Webhook Configuration ← Define where to send the notification
- ↓
- Repeat webhook creation for each additional receiving system
- (same Event Trigger, multiple destinations)
Step-by-Step Guide
Step 1 — Log In to Xilnex Portal
Navigate to https://portal.xilnex.com and sign in with your credentials.
Step 2 — Navigate to Xilnex Event Hub
Access the Event Hub via either of the following methods:
Global Search
Side Navigation
Global Search
- Click the Search Bar at the top-right corner of the portal.
- Type event.
- Select Xilnex Event Hub from the search results.
Side Navigation
- Click System Configuration in the left navigation menu.
- Under General System Settings, select Xilnex Event Hub.
Step 3 — Understand the Event Hub Dashboard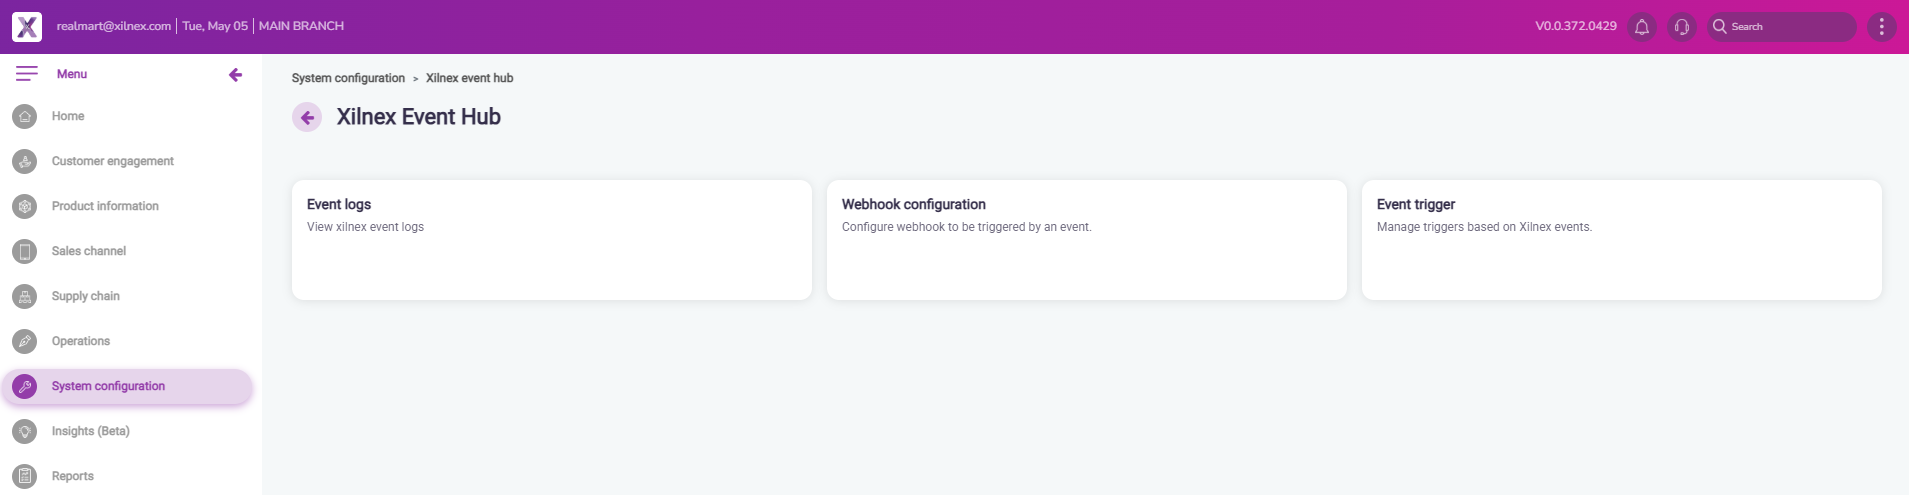
The Event Hub dashboard is organized into three functional sections:
| Section | Purpose |
|---|---|
| Event Logs | Audit trail of all triggered events — includes timestamp, status, and payload details |
| Webhook Configuration | Register and manage the external API endpoints that receive event notifications |
| Event Trigger | Define and activate the specific business events to monitor |
Step 4 — Create an Event Trigger

An Event Trigger instructs Xilnex which business event to monitor. Each event type only requires one trigger, configured once.
- From the dashboard, click Event Trigger.
- Click New at the top-right corner. A configuration dialog will appear.
- Complete the following fields:
Field Description Required Event Trigger Name A clear, descriptive label for this trigger (e.g., Complete Sales Output)✅ Yes Remark Optional internal notes for reference ❌ No Event Name Select the target business event from the dropdown (see full event list below) ✅ Yes - Click SAVE to activate the trigger.

See here for all event lists
Step 5 — Create a Webhook Configuration
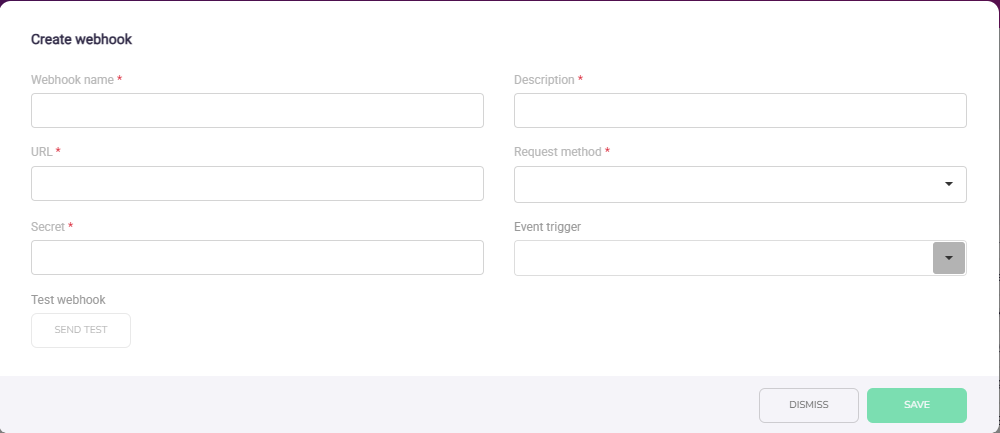
A Webhook Configuration defines the destination endpoint that receives the event payload. You may register multiple webhooks against the same Event Trigger — this is the recommended approach when multiple external systems need to consume the same event.

Prerequisite: The relevant Event Trigger (Step 4) must exist before creating a webhook.
- From the dashboard, click Webhook Configuration.
- Click New at the top-right corner. A configuration dialog will appear.
- Complete the following fields:
| Field | Description | Example |
|---|---|---|
| Webhook Name | An identifier for the receiving system | SAP Receive Complete Sales |
| Description | Brief explanation of this webhook's function | Notify SAP upon sale completion |
| URL | The API endpoint of the receiving system | https://your-system.com/api/receive |
| Request Method | HTTP method expected by the receiver | POST |
| Secret | Shared key used to verify request authenticity (see below) | Provided by your IT team |
| Event Trigger | The trigger this webhook responds to | Complete Sales Output |
Webhook Signature Verification
To validate that incoming requests originate from Xilnex, implement the following verification logic on the receiving system:
- Retrieve the signature from the request header: xilnex-webhook-signature
- Extract the raw request body (unparsed)
- Hash the raw body using HMAC-SHA256 with the shared secret
- Compare the computed hash against the header signature — if they match, the request is authentic
- If signature verification is not required by your receiving system, enter any placeholder value (e.g., -) in the Secret field.
Related Articles
Available Events: Xilnex Event Hub
Last Updated: 05 May 2026 Sales # Event Name 1 Create Sales 2 Confirm Sales 3 Confirm Sales v2 4 Complete Sales 5 Complete Sales v2 6 Cancel Sales 7 Update Sales 8 Cancel Sales Order 9 Confirm Sales Order 10 Complete Sales Order 11 Post Quotation to ...Xilnex Auth Integration Guide
Introduction Xilnex Auth implements OAuth 2.0, a widely adopted authorization framework that enables secure access to protected resources by issuing access tokens to client applications. This document provides a comprehensive guide on how to use ...OAuth Project & Client Permission Management
Overview The OAuth Project & Client Permission module controls which roles can access, configure, and manage OAuth projects and client credentials within the system. Permissions are managed under System Configuration > User Roles Permission > All ...Managing OAuth Client Credentials
Overview Xilnex Auth implements the OAuth 2.0 protocol to govern service-to-service authorization. Client credentials serve as the authentication identity for backend services, enabling them to authorize, or be authorized by, other services within ...
Recent Articles
Staff Meal Integration
Staff Meal Integration User Guideline Introduction Staff Meal Integration allows F&B POS to deduct staff meal credit / wallet balance directly from a third-party staff management system when staff purchase meals. This feature is currently supported ...Cancel Print of Full Tax Invoice
Overview In Classic POS, there is a feature called Print Full Tax Invoice, which allows users to generate a full tax invoice for a completed sale. The system must maintain an auditable log whenever a Full Tax Invoice is cancelled. This guideline ...Xilnex API Guide for 3rd party
1. Objective The objective of this API guide is to provide a clear reference for developers and integration partners on how to utilize the Xilnex APIs to establish communication with the Xilnex system. The guide outlines the available endpoints, ...Enabling On The Move 1.0 Access Permission (OTM1.0)
Overview This guide explains how to enable access for users who need to use On The Move 1.0 (OTM 1.0). For OTM 1.0, only one permission is required: Allow to access on the move If this permission is not enabled for the user's assigned user group, the ...Available Events: Xilnex Event Hub
Last Updated: 05 May 2026 Sales # Event Name 1 Create Sales 2 Confirm Sales 3 Confirm Sales v2 4 Complete Sales 5 Complete Sales v2 6 Cancel Sales 7 Update Sales 8 Cancel Sales Order 9 Confirm Sales Order 10 Complete Sales Order 11 Post Quotation to ...
Popular Articles
Basic - How to create a voucher-coupon
Voucher and coupon definition Voucher can be generated in bulk and can be used once Coupon can only be created one at a time (reusable code) and can be use multiple times Pre-voucher / coupon setup There are 2 things need to be prepared before we can ...Understanding DuitNow QR Payment in ClassicPOS
Introduction This document introduces the DuitNow QR payment feature available in the Xilnex Retail POS, enabling merchants to accept payments conveniently through Malaysia's national QR payment standard. The integration of DuitNowQR simplifies the ...Basic - How to change custom cost to another branch that don’t have custom cost
Change custom cost to another branch that don’t have custom cost 1. Get the item list from the location with custom cost (Item Code, Name, Custom Cost) 2. Make sure the Show Location Price are selected 3. Export the item list in Excel 4. The file ...Intermediate - How to Bill & Post to Sales from Transfer Note
1.0 Purpose A bill is required from transfer note when an inventory transfer involves financial transactions, cost allocation, or compliance with tax and accounting regulations. It is used when stock is moved between outlets that operate as separate ...Basic - How to enable E-Receipt Portal and QR Code Setup on Printing format in Xilnex
Enable E-Receipt Portal Enable the E-receipt functionality Once Enabled, you will be getting the E-Receipt portal link Continue under Theme & Styling, enabled for the E-Invoice (LHDN) You can customize the look and feel of the E-Receipt portal ...