Components of a Xilnex Web Report
Select any report from the list to open it. We will use the Daily Sales Item report as an example.
1. Report Fields
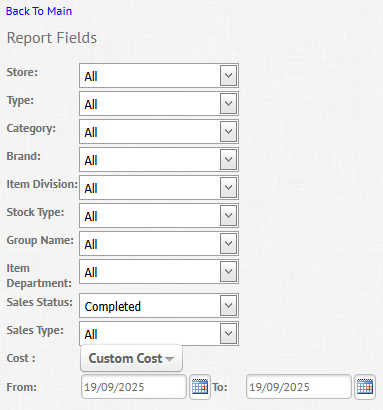
Report fields are parameters that are used to define the scope of a report. They determine:
- Where: The location or outlet
- When: A specific date or date range
- What conditions: Document status or item grouping (category, group, brand etc)
The table below describes each parameter for the sample report.
2. Optional Fields
Optional fields provide additional settings specific to the current report. These settings may:
- Change how values are generated (using an alternative method), or
- Include additional report details that are not part of the default output.


Example: If the "Generate business session info" setting is enabled, sales values in the report will be generated based on the business date instead of the sales date.
3. Advanced Search
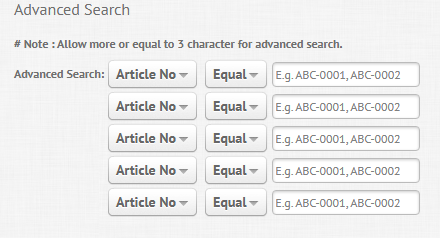
Advanced search allows users to apply additional filters before generating a report. This feature enables precise control over the output by defining specific attributes to include in the report. Each General Report includes default data fields that can be organized into different areas. The placement of these fields determines how the report is structured:
- Data Area: Rightmost area of the report. Used for numeric fields, like quantity, price and cost amounts.
- Row Area: Leftmost area of the report. Used for text or header fields such as document ID, document status, date, outlet and so on.
- Filter Area: Holds fields removed from the Data or Row areas. Fields placed here will not appear in the generated report.
- Column Area: Used to insert fields as headers for the Data Area. When the report is generated, each value in the Column Area creates its own column for the corresponding Data Area values.
5. Advance Settings
The Advance Settings section provides extended options to control how data is calculated, summarized, and presented.
This section is collapsed by default and can be accessed by clicking the section.
a. Enable Value Sorting
- Only applies to the last column of the Data Area.
- Sorts the values of the rightmost column from the smallest to the largest.
- If any of the fields in the Data Area is rearranged, the report must be re-run to refresh results.
b. Show/Hide Total
- These functions control whether totals and grand totals appear in the report.
- An example of what the report will look like when these settings are all disabled is shown below. The report looks much cleaner, but without any summary of the results.
- These settings are enabled by default for all reports.
c. Show Column Grand Total
- Displays a single grand total at the end of the columns, when there is more than 1 data group (highlighted in red) in the Data Area.
- The example below shows the report displayed when only the "Show Column Grand Total" setting is enabled.
d. Show Column Totals
- Displays the subtotals for each data group with the condition that there is more than 1 column (highlighted in red) within the data group.
- The example below shows the report displayed when only the "Show Column Totals" setting is enabled.
e. Show Row Grand Total
- Displays a single grand total for each column, when multiple rows exist in the row area.
- The example below shows the report displayed when only the "Show Row Grand Totals" setting is enabled.
f. Show Row Totals
- Displays subtotals for each row group with the condition that there are multiple rows for that group.
- The example below shows the report displayed when only the "Show Row Totals" setting is enabled.|
g. Summary Display Type
- Allows users to display data in different comparative or percentage formats.
- Condition: The report must be generated first before this feature is usable.
Steps to use this feature:
- Select the "Field" and "Display Type".
- Then click the "Show More Fields" button.
- A new field will be available. Drag the field into the Data Area.
- Once the report is generated, the data for this new field will be shown as below.
- A brief description of the available display types are as follows:Display TypeDescriptionPercent of ColumnShows the result of the [selected field] ÷ [total of the row].Percent of RowShows the result of the [selected field] ÷ [total of the column].Percent of Column Grand TotalShows the result of the [selected field] ÷ [grand total of the row].Percent of Row Grand TotalShows the result of the [selected field] ÷ [grand total of the column].Percent of Grand TotalShows the result of the [selected field] ÷ [grand total of the row and column].
h. Summary Type
- Defines how numeric data is aggregated in the report.
- Condition: The report must be generated first before this feature is usable.
Steps to use this feature:
- Select the "Field" and "Summary Type".
- Then click the "Show More Fields" button.
- A new field will be available. Drag the field into the Data Area.
- Once the report is generated, the data for this new field will be shown as below.
i. Top Value Count
- Highlights the top n results based on a selected field.
- Condition: The report must be generated first before this feature is usable.
Steps to use this feature:
- Select the "Field" and "Top Value Number".
- Ensure the field is present in the table. If it is not, please add the field from the "Show More Field" list.
- Before setting applied: All records will are displayed.
- After setting applied: Only the top 2 records of the field selected will be displayed.
Related Articles
Web Report Types in Xilnex
Report Types The Web Report offers three types of reports to suit different business needs: General Reports, Defined Reports, and Custom Reports. Each type provides varying levels of flexibility and customization. General Reports General Reports are ...Configuring Web Report Access
How to Configure Web Report Access? 1. Click on "System Configuration" on the left side panel. 2. Scroll down to find "User roles permission" under Users & Roles section. 3. Click on "All permission". 4. Click on "More", then select "Menu (Xilnex ...Getting Started with Xilnex Web Report
Product Introduction Web Report is a centralized reporting tool that enables businesses to generate insightful reports based on the transaction data captured across various Xilnex products, including Xilnex Classic, Live Order, F&B Go, Xilnex ...
Recent Articles
Staff Meal Integration
Staff Meal Integration User Guideline Introduction Staff Meal Integration allows F&B POS to deduct staff meal credit / wallet balance directly from a third-party staff management system when staff purchase meals. This feature is currently supported ...Cancel Print of Full Tax Invoice
Overview In Classic POS, there is a feature called Print Full Tax Invoice, which allows users to generate a full tax invoice for a completed sale. The system must maintain an auditable log whenever a Full Tax Invoice is cancelled. This guideline ...Xilnex API Guide for 3rd party
1. Objective The objective of this API guide is to provide a clear reference for developers and integration partners on how to utilize the Xilnex APIs to establish communication with the Xilnex system. The guide outlines the available endpoints, ...Enabling On The Move 1.0 Access Permission (OTM1.0)
Overview This guide explains how to enable access for users who need to use On The Move 1.0 (OTM 1.0). For OTM 1.0, only one permission is required: Allow to access on the move If this permission is not enabled for the user's assigned user group, the ...Available Events: Xilnex Event Hub
Last Updated: 05 May 2026 Sales # Event Name 1 Create Sales 2 Confirm Sales 3 Confirm Sales v2 4 Complete Sales 5 Complete Sales v2 6 Cancel Sales 7 Update Sales 8 Cancel Sales Order 9 Confirm Sales Order 10 Complete Sales Order 11 Post Quotation to ...
Popular Articles
Basic - How to create a voucher-coupon
Voucher and coupon definition Voucher can be generated in bulk and can be used once Coupon can only be created one at a time (reusable code) and can be use multiple times Pre-voucher / coupon setup There are 2 things need to be prepared before we can ...Understanding DuitNow QR Payment in ClassicPOS
Introduction This document introduces the DuitNow QR payment feature available in the Xilnex Retail POS, enabling merchants to accept payments conveniently through Malaysia's national QR payment standard. The integration of DuitNowQR simplifies the ...Basic - How to change custom cost to another branch that don’t have custom cost
Change custom cost to another branch that don’t have custom cost 1. Get the item list from the location with custom cost (Item Code, Name, Custom Cost) 2. Make sure the Show Location Price are selected 3. Export the item list in Excel 4. The file ...Intermediate - How to Bill & Post to Sales from Transfer Note
1.0 Purpose A bill is required from transfer note when an inventory transfer involves financial transactions, cost allocation, or compliance with tax and accounting regulations. It is used when stock is moved between outlets that operate as separate ...Basic - How to enable E-Receipt Portal and QR Code Setup on Printing format in Xilnex
Enable E-Receipt Portal Enable the E-receipt functionality Once Enabled, you will be getting the E-Receipt portal link Continue under Theme & Styling, enabled for the E-Invoice (LHDN) You can customize the look and feel of the E-Receipt portal ...