Transfer Note - User Manual Guide with multiple scenario
Description
This guide covers everything related to the Transfer Note module in Xilnex Inventory — the feature used to move stock between HQ and outlets (or between outlets). It consolidates five workflows into one document:
- Create a Transfer Note and deliver it
- Convert an outlet's stock request into a Transfer Note (HQ side)
- Request stock from HQ and receive it (outlet side, two phases)
- Receive a shipped Transfer Note from HQ
- Reconcile a short or over receipt (Direct Complete / Auto Return)
Overview: What is a Transfer Note?
A Transfer Note records the movement of stock from one location (Transfer From) to another (Transfer To) — typically HQ to outlet, or outlet to outlet. It has a lifecycle of statuses:
| Status | Meaning |
|---|---|
| Saved | Still in draft/checking — editable, not yet dispatched |
| Confirmed | Finalised, ready for shipment — no further edits allowed |
| Shipped | Goods have been dispatched by the sending branch, awaiting receipt |
| Completed | Receiving branch has confirmed receipt of all quantities |
Common header fields across every flow: Transfer ID (auto-generated), Transfer Type (e.g. Inter Outlet, Inter Company, Auto Return), Transfer From, Transfer To, Transfer Date, Transfer By, and Status.
Section 1: Create a Transfer Note and Deliver It
How to Create Transfer Note and do Delivery for this Transfer Note
- Inventory => Transfer note
- Select Transfer to => Any Outlet
- Click white space to select price scheme (If different transfer price scheme)
- Add Item by Scanning/Type in the barcode or Use Find Item Button
- Key in the quantity transfer
- Transfer Note document status:
- Confirm = Already finalize this document and ready for shipment, no edit is allow.
- Saved = Still in checking process, may change during saved status. - Press Delivery when all ready and proceed to shipment process
- Press Ship to complete shipment - After shipment completed, the status will update to Shipped
- Print to print necessary document
How to add item for transfer note
By Using Scan / Type in Barcode (With Quantity Editor)
- Go to Add => Scan / Type in Item Barcode
- Press Enter key to proceed
- Quantity Editor will prompt when enter - Fill in Quantity
- Press Enter / Click OK
- Continue Step 1 to 3 for next item
By Using Find Item Button
- Click on Find Item button
- Search item by item code or item name
- Fill in the quantity and cost
- Continue steps 2 and 3 for next item
- Click Add item
Section 2: Convert an Outlet's Stock Request into a Transfer Note
When an outlet submits a stock request to HQ, the HQ user must review the pending requests and convert them into a Transfer Note. This section walks through the full process — from locating pending stock requests in the Stock Request List, to generating and confirming the Transfer Note — so that stock can be dispatched to the requesting outlet.
Step 1: Navigate to the Stock Request List
From the main navigation bar, click Listing.
Under the Listing section, click the Stock Request List module icon.
You will be taken to the Stock Request List screen, which displays all incoming stock requests from outlets.
Step 2: Filter for Pending Requests Directed to Your Branch
Once inside the Stock Request List, you need to narrow the view to show only the requests that are pending and addressed to your branch.
In the Request dropdown at the top-left of the screen, select To This Branch.
Note: This filters the list to show only stock requests that have been sent to the branch you are currently logged in as (i.e., requests directed to HQ or your warehouse).
Set the Date From and Date To fields to cover the period you want to process.
For example: Date From
07/07/2026— Date To06/08/2026.In the Status column filter, set the value to Pending.
Note: After applying the filter, the grid will show only records with Status = Pending. The status bar at the bottom of the screen confirms the filter is active, for example: "Filtering Field: ETA [August]". You will see columns including Request From, ETA, Request Header ID, Request ID, Status, Item Code, Name, Vendor Name, and Type.
At this point, you should see the list of pending stock request line items from the outlet, each with its own Request ID and item details.
Step 3: Select the Records to Convert
-
Click on the first stock request row you want to process to highlight it.
To select multiple rows, hold Ctrl and click each additional row, or hold Shift and click the last row in a range to select a contiguous block.
Note: You can select all the pending items under the same Request Header ID to process the entire outlet request at once. Check the Request Header ID column to group related lines.
Step 4: Open the Context Menu and Add to Transfer Note
With the desired rows highlighted, right-click on any of the selected rows.
A context menu will appear with the following options:
- Copy
- Copy With Field Label
- Bulk Edit (F2)
- Add To Sales
- Add To Transfer Note
- Reject Stock Request
- Add To Purchase Order
- Add To Purchase Order (By request outlet)
- Print Stock Request
- Force Complete Stock Request
- Select
- Unselect
- Press Select first to direct enable selection for highlighted stock request
-
Click Add To Transfer Note.
Step 5: Confirm the Action
A confirmation dialog will appear with the message:
"Are you sure want to add selected records to transfer note?"
Click Yes to proceed.
Note: Clicking No will cancel the action and return you to the Stock Request List without making any changes.
Step 6: Review and Confirm the Transfer Note
After clicking Yes, the system will automatically generate a Transfer Note and open it in a new tab labelled Transfer Note.
Review the Transfer Note details that have been pre-populated from the stock request:
Field Description Transfer ID Auto-generated unique identifier for this transfer (e.g., 664039) Transfer Type Leave blank by default Transfer Date Defaults to the current date and time Transfer From The branch fulfilling the request (e.g., HQ) Transfer To The outlet that submitted the request (e.g., Test1) Status Shows Saved Bill Status Shows NonBillable (based on outlet ownership) Review the item lines in the grid to ensure all items, quantities, and unit costs are correct. Each row corresponds to one item from the stock request.
Important: If an item or quantity is incorrect, you can use Find Item, Delete, or the Add field to adjust the Transfer Note before confirming. Do not proceed to confirmation if the items are wrong — changes cannot be made after the note is confirmed.
-
Optionally, add any notes in the Remarks field at the bottom-left of the form.
When you are satisfied the Transfer Note is correct, click the green Confirm button at the bottom-right of the screen.
Note: A second confirmation prompt will appear asking you to confirm. Click Yes to finalise the Transfer Note.
Step 7: Deliver and Ship the Transfer Note
After confirming, proceed with your standard Transfer Note fulfilment process:
-
Use the Deliver function to record that the goods have been dispatched from your branch.
-
Use the Ship function to update the transfer status once the stock is in transit to the outlet.
To produce a physical copy of the Transfer Note for your records or for the delivery driver, click Print at the top of the Transfer Note screen.
Note: Print generates a printable version of the Transfer Note. Hand this to the delivery driver or attach it to the outgoing stock as a packing reference.
Section 2 Summary
| Step | Action |
|---|---|
| 1-2 | Navigate to Listing > Stock Request List |
| 3-5 | Filter by To This Branch, date range, and Pending status |
| 6-7 | Select the pending request rows |
| 8-9 | Right-click and choose Select > Add To Transfer Note |
| 10-11 | Confirm the action in the dialog |
| 12-15 | Review the auto-generated Transfer Note and click Confirm |
| 16-18 | Deliver, Ship, and Print the Transfer Note |
Section 3: Request Stock from HQ and Receive It
This section explains how an outlet requests stock from HQ or another outlet and how to receive the stock once HQ has shipped it, using the Transfer Note feature in Xilnex Inventory. The process has two distinct phases: first, the outlet raises a Transfer Request; second, once the goods arrive, the outlet confirms receipt via the Listing module. Follow each phase in order.
Phase 1 — Request Items from HQ
Step 1: Open the Transfer Note module
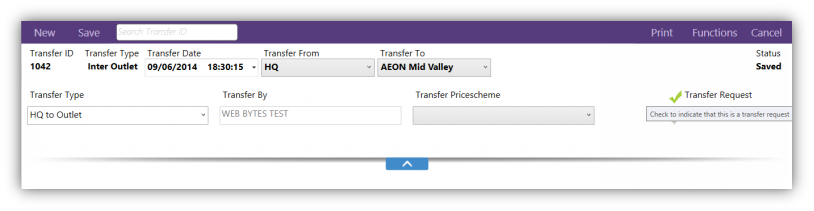
From the main navigation, go to Inventory and select Transfer Note. The Transfer Note screen opens in a new tab. You will see the toolbar at the top with New, Save, and a Search Transfer ID field.
Step 2: Create a new Transfer Note
Click New in the top toolbar to start a blank Transfer Note. The form header fields become editable. A Transfer ID will be assigned automatically once the record is saved.
Step 3: Enable the Transfer Request checkbox
On the right side of the form, check the Transfer Request checkbox. The tooltip reads: "Check to indicate that this is a transfer request."
Important: This checkbox flags the Transfer Note as a request rather than an actual outgoing transfer. HQ will see this flag and know that the outlet is asking for stock — HQ has not dispatched anything yet. You should see a green tick appear next to the Transfer Request label when it is enabled.
Step 4 : Fill in the Transfer Note header
Complete the header fields as follows:
| Field | What to enter |
|---|---|
| Transfer From | Select HQ — this is the source location where the stock will come from |
| Transfer To | Select your outlet (e.g., AEON Mid Valley) — this is where the stock will be delivered |
| Transfer By | Pre-filled with your login name — no action needed |
| Transfer Price scheme | Leave blank unless instructed otherwise |
Tip: The Transfer Date is populated automatically with the current date and time. The Transfer By field also records the logged-in user automatically.
Step 5: Set the Transfer Type direction to "HQ to Outlet"
In the row of fields below the header, locate the Transfer Type dropdown. Set it to From HQ to Outlet. This tells the system that HQ is the supplier for this transfer.
At this point, the header should show:
- Status: Saved (will update after saving)
- Transfer From: HQ
- Transfer To: your outlet name
- Transfer Request: checked
Step 6: Add items to the Transfer Note
Scroll down to the item line section. You have two ways to add items:
Option A — Find Item (recommended):
- Click the green Find Item button.
- A selection list will appear showing items with their Item ID and Item Code.
- Tick the checkbox next to each item you want to request (e.g., Item ID 102, Item Code ASC-006601-BLK).
- Click Add Item to confirm your selection and close the list.
Option B — Direct entry:
- Type the Item ID or Item Code directly into the Add field next to the item grid.
- Press Enter or click the add button to append the line.
Tip: You can select multiple items at once using Option A by ticking multiple checkboxes before clicking Add Item.
Step 7: Set the requested quantity for each item
After adding an item, a Quantity Editor dialog will appear automatically. It shows:
Enable the Transfer Request checkbox
On the right side of the form, check the Transfer Request checkbox. The tooltip reads: "Check to indicate that this is a transfer request."
Important: This checkbox flags the Transfer Note as a request rather than an actual outgoing transfer. HQ will see this flag and know that the outlet is asking for stock — HQ has not dispatched anything yet. You should see a green tick appear next to the Transfer Request label when it is enabled. Do not save without ticking this box.
| Field | Description |
|---|---|
| All Outlet total Qty | Total stock across all outlets (read-only) |
| Current Outlet Qty | Your outlet's current on-hand quantity (read-only) |
| Quantity | Enter how many units you are requesting from HQ |
| Cost | Unit cost, pre-filled based on the item's price scheme — adjust only if instructed |
| Total Cost | Calculated automatically (Quantity x Cost) |
Enter the quantity you need in the Quantity field, then click OK to confirm.
Step 8: Review the item line and save
After clicking OK, the item appears as a row in the item grid with:
- Item ID, Item Code, Item Name, Alt Lookup — item identification
- Transferred Quantity (UOM) — the quantity you just entered (e.g., 10.00)
- Total Delivered — shows 0.00 until HQ ships
- Total Received — shows 0.00 until you receive
Repeat Steps 7 and 8 for any additional items you need to request.
When you are satisfied with the item list, click Save in the top toolbar. The Transfer Note status will change to Saved.
The request is now submitted. HQ will review it, pick and pack the goods, and ship them to your outlet. The Transfer Note status will remain Saved until HQ updates it. When the goods arrive, proceed to Phase 2 below.
Phase 2 — Receive Items from HQ
Once HQ has shipped the goods, the Transfer Note status will be updated to Shipped. You must then record the receipt in the system.
Step 9: Open the Transfer Note listing
Go to Listing in the main navigation, then select Transfer Note. The listing screen opens and displays all Transfer Notes associated with your outlet.
Step 10: Filter to find your Transfer Note

Use the filter fields at the top of the listing to narrow the results:
| Filter | What to enter |
|---|---|
| Transfer Note | Select Transfer To from the dropdown (you are the receiving outlet) |
| Branch | Select your outlet (e.g., AEON Mid Valley) |
| Date From | Enter the start date of your date range |
| Date To | Enter the end date of your date range |
Click the search/filter button or press Enter to apply the filters. The list will display Transfer Notes matching your filter, showing Transfer ID, Transfer To, Transfer By, Status, Transfer Date, Last Receive, and Last Receive Date.
Tip: Records with status Completed have already been fully received. Records with status Shipped are awaiting receipt. Look for the record with Status: Shipped to proceed.
Step 11: Open the Shipped Transfer Note
Double click on the row with Status: Shipped (e.g., Transfer ID 1042) to open the Transfer Note detail view.
The detail screen shows:
- Header: Transfer ID, Transfer Type (Inter Outlet), Transfer Date, Transfer From (HQ), Transfer To (your outlet), Status: Shipped
- Item grid: lists all items that HQ has packed, with columns for Item ID, Item Code, Item Name, Transferred Quantity, Total Delivered, Total Received, Remark, UOM Factor, Cost (UOM), and Carton
- A Remarks section and Last Receive By / Last Receive Date fields at the bottom
- A green Receive button at the bottom-right
Step 12: Receive the goods
Review the item quantities on screen against the physical goods you have received. Confirm that Total Delivered matches what physically arrived, then click the green Receive button at the bottom-right of the screen.
Note: The Receive button only appears when the Transfer Note status is Shipped. If it is not visible, the note has not yet been shipped by HQ.
The system generates a Receive record automatically.
Step 13: Review and confirm the receipt
Clicking Receive opens the Receive confirmation screen. This screen shows:
| Field | Value |
|---|---|
| Receive ID | Auto Number (assigned by the system) |
| Vendor | HQ |
| Receive Date | Today's date and time (auto-filled) |
| Invoice No | The Transfer ID from the originating Transfer Note (e.g., 1042) |
| Status | NEW |
The item grid displays:
- Delivery ID — links back to the Transfer Note
- Item ID, Item Code, Item Name — item details
- Delivered Quantity — the quantity HQ shipped (e.g., 10.00)
- Receive Quantity — editable; pre-filled to match the delivered quantity (adjust if there is a discrepancy)
- Disc % — discount percentage, if applicable
At the bottom of the screen you will also see:
- Sub Total, Service Charges %, Discount %, and Total
- A Remarks field for any notes
- Receive By — pre-filled with your login name
Important: Verify the Receive Quantity for each line. If you physically received fewer items than the delivered quantity (e.g., due to damage or short shipment), update the Receive Quantity to reflect what was actually received before confirming.
Step 14: Confirm the receipt
Click the green Confirm button at the bottom-right to complete the receiving process.
The system will:
- Update the Total Received column in the Transfer Note.
- Add the received quantity to your outlet's inventory stock.
- Update the Transfer Note status to Completed (if all delivered quantities have been received) — the Last Receive By and Last Receive Date fields on the Transfer Note will also be updated automatically.
Note: If you only partially received the shipment (e.g., some items were short-delivered), the Transfer Note status may remain as Shipped until all items are fully received. You can click Receive again later to record additional receipts against the same Transfer Note.
Section 3 Summary
| Phase | Navigation Path | Key action |
|---|---|---|
| Request from HQ | Inventory > Transfer Note > New | Confirm Inter Outlet type, set HQ to Outlet direction, tick Transfer Request, add items, Save |
| Receive from HQ | Listing > Transfer Note | Find Shipped record, click Receive, verify quantities, Confirm |
Section 4: Receive a Shipped Transfer Note from HQ
This section explains how an outlet receives stock transferred from HQ using the Xilnex Inventory system. When HQ ships items to a branch, a Transfer Note is created on the HQ side with a Shipped status. The outlet must locate that Transfer Note, verify the items listed, and confirm receipt. Once confirmed, the system generates a Receive record and updates the branch's inventory accordingly.
Prerequisites
- You must be logged in to Xilnex Inventory at your outlet (branch) account.
- HQ must have already created and shipped a Transfer Note to your branch. The Transfer Note status must show Shipped before you can receive it.
Steps
Step 1 — Open the Transfer Note listing
- From the main menu, navigate to Listing.
- Select Transfer Note.
The Transfer Note listing screen opens.
Step 2 — Filter for incoming transfers from HQ
On the listing screen, set the filter fields at the top to locate the Transfer Note sent by HQ:
- In the Transfer Note dropdown (top-left), select Transfer To. This filters the list to show transfer notes addressed to your branch.
- In the Branch dropdown, select your branch (e.g., AEON Mid Valley).
- In the Date From field, enter the start date of the period you want to search (e.g.,
09/05/2014). - In the Date To field, enter the end date (e.g.,
09/06/2014).
The grid below will refresh and display all Transfer Notes matching your filter criteria.
What you see on screen: The list shows columns for Transfer ID, Transfer To, Transfer By, Status, Transfer Date, Last Receive, Last Receive Date, and Transfer (source). Look for entries with a Status of Shipped — these are notes that have been dispatched by HQ but not yet received by your branch. Notes with a Status of Completed have already been fully received.
Step 3 — Open the Transfer Note to receive
- In the grid, locate the Transfer Note you want to receive. It should have a Status of Shipped.
- Click on that row to open the Transfer Note detail screen.
Step 4 — Review the Transfer Note details
On the Transfer Note detail screen, review the following header information to confirm this is the correct transfer:
| Field | Description |
|---|---|
| Transfer ID | Unique ID of this transfer (e.g., 1042) |
| Transfer Type | The type of transfer — will show Inter Outlet for HQ-to-branch transfers |
| Transfer Date | Date and time HQ created and shipped the transfer |
| Transfer From | Source of the transfer — should be HQ |
| Transfer To | Your branch name (e.g., AEON Mid Valley) |
| Status | Should display Shipped |
Below the header, the item grid lists every item included in this Transfer Note. Review the following columns for each line item:
| Column | Description |
|---|---|
| Item Code | The item's stock code |
| Item Name | Full description of the item |
| Transferred Quantity | How many units HQ sent |
| Total Delivered | Total units delivered across all deliveries |
| Total Received | Units your branch has already received (0.00 if not yet received) |
| UOM Factor | Unit of measure factor |
| Cost (UOM) | Cost per unit |
| Carton | Carton quantity (if applicable) |
Tip: Check that the Transferred Quantity and Total Delivered values match what you physically received. If there is a discrepancy, contact HQ before proceeding.
At the bottom of the screen you will also see a Remarks field and the Last Receive By / Last Receive Date fields, which will be filled in once you complete the receive.
Step 5 — Initiate the receive
- Once you have confirmed the items and quantities are correct, click the green Receive button in the bottom-right corner of the Transfer Note detail screen.
What you see on screen: Clicking Receive opens a new Receive entry screen. This screen is automatically pre-populated with the Transfer Note's item data.
Step 6 — Review and confirm the Receive entry
On the Receive entry screen, verify the following details before confirming:
Header fields:
| Field | Description |
|---|---|
| Receive ID | Set to Auto Number — the system will assign an ID on confirmation |
| Vendor | Automatically set to HQ (the source of the transfer) |
| Receive Date | Automatically populated with the current date and time |
| Invoice No | Pre-filled with the Transfer ID (e.g., 1042) — edit if your outlet uses a different reference |
| Terms Remark | Optional field for payment or delivery terms notes |
| Status | Shows NEW — this will update to confirmed once you complete the step |
Item grid:
The grid lists all items from the Transfer Note. For each row, verify:
| Column | Description |
|---|---|
| Delivery ID | Linked delivery reference from the Transfer Note |
| Item Code | Stock code of the item |
| Item Name | Description of the item |
| Delivered Quantity | Quantity HQ recorded as delivered |
| Receive Quantity | Quantity your branch is confirming as received (highlighted in yellow — editable) |
| Disc % | Discount percentage, if applicable |
Important: If the quantity you physically received differs from the Delivered Quantity, update the Receive Quantity field before confirming. Only confirm quantities that you have actually received and verified.
Footer fields:
At the bottom of the screen, review the totals:
- Sub Total — Total cost of all received items
- Service Charges % — Any applicable service charges
- Discount % — Any applicable discount
- Total — Final amount after charges and discounts
- Receive By — Automatically set to the logged-in user
- Remarks — Optional field to add any notes about this receipt
Step 7 — Confirm the receipt
- Once all quantities and details have been verified, click the green Confirm button in the bottom-right corner.
The system will:
- Assign a Receive ID to this receive record.
- Update the Transfer Note's Status to Completed.
- Update the Last Receive By and Last Receive Date fields on the Transfer Note.
- Add the received quantities to your branch's inventory stock levels.
What you see on screen: After confirmation, the Receive record is saved and the screen reflects the updated status. You can use Print from the toolbar at the top to print a copy of the Receive record for your physical records.
Section 4 Summary
| Step | Action |
|---|---|
| 1 | Go to Listing > Transfer Note |
| 2 | Filter by Transfer To, your Branch, and the relevant Date range |
| 3 | Click the Transfer Note row with Status: Shipped |
| 4 | Review Transfer Note header and item details |
| 5 | Click Receive |
| 6 | Verify Receive entry details — adjust Receive Quantity if needed |
| 7 | Click Confirm to complete the receipt |
Section 4 Key Takeaways
- The Transfer Note must have a Shipped status before your branch can receive it. If it shows Completed, it has already been received.
- Always verify the physical stock against the Transferred Quantity before clicking Confirm.
- The Receive Quantity field (highlighted in yellow) is editable — update it if you received a different quantity than what was shipped.
- After confirmation, inventory levels at your branch are updated automatically — no manual stock adjustment is needed.
Section 5: Reconcile a Short or Over Receipt (Transfer Back Insufficient Quantity)
Introduction
When an outlet receives fewer items than were delivered by HQ (or vice versa), Xilnex Inventory provides a built-in mechanism to reconcile the discrepancy. Using the Direct Complete function on the original transfer note, the system automatically marks the note as complete and generates a new Auto Return transfer note for the shortfall quantity. The receiving outlet (in this example, HQ) then processes that Auto Return note to formally receive and reconcile the returned items.
This section walks through every step of that process — from identifying the quantity mismatch on the original transfer note, triggering the Direct Complete action, switching outlets, and finally receiving the auto-generated return transfer note.
Part 1 — Understand the Quantity Discrepancy
Before triggering any action, confirm that a discrepancy exists between what was delivered and what was received.
Step 1 — Open the original Transfer Note
Navigate to the transfer note that is currently in Shipped status. You will see the following key fields in the item list:
- Total Delivered — the quantity shipped by the Transfer From outlet (e.g., AEON Mid Valley)
- Total Received — the quantity actually received by the Transfer To outlet (e.g., HQ)
The header of the note shows:
| Field | Example Value |
|---|---|
| Transfer ID | 1099 |
| Transfer Type | Inter Company |
| Transfer From | AEON Mid Valley |
| Transfer To | HQ |
| Status | Shipped |
What you will see on screen: The Transfer Note detail page opens showing the item list with two highlighted columns — Total Delivered and Total Received. In this example, item "Beauty Product" shows Total Delivered = 2.00 and Total Received = 1.00, and "LOGITECH MOUSE M185" likewise shows Total Delivered = 2.00 and Total Received = 1.00. The Status in the top-right corner reads Shipped.
This confirms a shortfall: 1 unit of each item was not received by the outlet. The next steps will resolve this discrepancy.
Part 2 — Trigger Direct Complete to Create the Auto Return Note
Step 2 — Open the Functions menu
While viewing the original Transfer Note (Transfer ID 1099, Status: Shipped), click Functions in the top-right toolbar.
A dropdown menu will appear with the following options:
- Import
- Export
- Force Complete
- Direct Complete (highlighted)
- Barcode
- Post To Adjustment
- Post To Sales
- Layout Setting
Step 3 — Click Direct Complete
Click Direct Complete from the dropdown.
What you will see on screen: The Functions dropdown is open and Direct Complete is highlighted with a green checkmark icon. This option instructs the system to receive all delivered items and automatically create a return transfer note for any quantity not yet received.
Step 4 — Confirm the action
A Confirmation dialog will appear with the message:
"System will receive all delivered items and create return transfer note, click OK to continue"
Click Yes[Enter] to proceed.
Tip: You can also press the Enter key on your keyboard as a shortcut for Yes[Enter].
What you will see on screen: A modal dialog titled "Confirmation" displays the message above, with a green Yes[Enter] button and a red No[Esc] button.
Step 5 — Acknowledge the completion message
After confirming, a Complete dialog will appear with the message:
"Transfernote has been completed and return transfer note created."
Press [Space] (or click the [Space] button) to dismiss the dialog and return to the system.
What you will see on screen: A modal dialog titled "Complete" confirms the operation was successful. The system has now marked Transfer ID 1099 as complete and automatically created a new Auto Return transfer note for the shortfall quantity.
Part 3 — Switch to the Receiving Outlet
The Auto Return transfer note was created with HQ as the Transfer From outlet (since the items are being returned from HQ back to AEON Mid Valley). You must now log in as the HQ outlet to process and receive that note.
Step 6 — Open the Change Outlet menu
Click the hamburger menu icon [≡] in the top-left corner of the Xilnex application.
A side menu will slide out showing options including Change Outlet, Journal Log, Attendance, and others.
Click Change Outlet.
What you will see on screen: The sidebar menu is open and Change Outlet is listed at the top with a branch/outlet icon. The current Transfer Note tab remains visible in the background.
Step 7 — Confirm closing unsaved forms
An Attention dialog will appear with the message:
"Change branch function will close all the unsaved forms. Are you sure you want to proceed?"
Click Yes to continue.
What you will see on screen: A Windows-style dialog box with a warning icon, the message above, and Yes / No buttons.
Step 8 — Select the outlet
The Select Branch window opens, displaying all available outlets:
- AEON Mid Valley
- HQ (select this one)
- Melacca Outlet
- OutletA
- Queensbay
- SBN1
Click HQ to highlight it, then click the Select button.
What you will see on screen: The Select Branch window lists all outlets. HQ is highlighted in blue. Click Select to switch the active session to the HQ outlet.
Note: In your environment, select whichever outlet is the Transfer From outlet on the Auto Return note. In this example, HQ sent items back, so HQ must process the delivery.
Part 4 — Locate the Auto Return Transfer Note
Step 9 — Navigate to Listing
After switching to HQ, click Listing in the main navigation menu.
What you will see on screen: A teal/blue Listing button is displayed in the navigation area.
Step 10 — Open Transfer Note List
Under the Transfer Note section, click Transfer Note List.
What you will see on screen: The Transfer Note section shows two options — Transfer Note List (highlighted with a red border) and Transfer Note List (By Item). Click the first option.
Step 11 — Search for the Auto Return document
In the Transfer Note List, set the following filter criteria to locate the Auto Return note:
| Filter Field | Value |
|---|---|
| Transfer Note | Transfer From |
| Outlet | HQ |
| Transfer Type | Auto Return |
| Status | Confirmed |
After setting the filters, click the Refresh button (green circular arrow icon in the top-right of the list).
The list will display a record similar to the following:
| Transfer ID | Transfer To | Transfer By | Transfer Date | Transfer Type | Transfer From | Status |
|---|---|---|---|---|---|---|
| 10100 | AEON Mid Valley | WEB BYTES TEST | 28/07/2015 | Auto Return | HQ | Confirmed |
What you will see on screen: The Transfer Note List shows one Auto Return record with Transfer Type: Auto Return and Status: Confirmed. Notice that this new Transfer ID (10100) is different from the original Transfer ID (1099) — the system created this note automatically during the Direct Complete step.
Step 12 — Open the Auto Return Transfer Note
Double-click the Auto Return record to open the Transfer Note detail page.
What you will see on screen: The Transfer Note detail page for Transfer ID 10100 opens. Key details to verify:
- Transfer ID: 10100 (new, system-generated — different from the original 1099)
- Transfer From: HQ
- Transfer To: AEON Mid Valley
- Status: Confirmed
- Remarks: Auto Return
- Total Delivered and Total Received columns both show 0.00 for all items (waiting to be received)
- A green Receive button is visible in the bottom-right corner
Part 5 — Receive the Auto Return Transfer Note
Step 13 — Click Receive
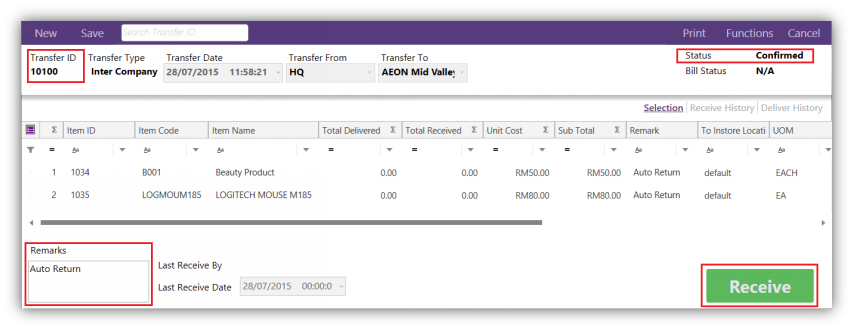
After verifying the Auto Return Transfer Note details, click the green Receive button in the bottom-right corner of the page to complete the transfer-back process.
What you will see on screen: The Auto Return Transfer Note (ID: 10100) is displayed in full detail. The Remarks field shows "Auto Return". The Receive button is in the bottom-right. Clicking it will formally receive the returned items into the HQ inventory and complete the reconciliation.
Section 5 Summary
| Step | Action | Location |
|---|---|---|
| 1 | Open original Transfer Note and note the Total Delivered vs Total Received discrepancy | Transfer Note detail (Status: Shipped) |
| 2–3 | Click Functions > Direct Complete | Transfer Note toolbar |
| 4 | Confirm the action in the Confirmation dialog | Confirmation dialog |
| 5 | Dismiss the Complete dialog with [Space] | Complete dialog |
| 6–7 | Click [≡] > Change Outlet > confirm with Yes | Application sidebar |
| 8 | Select the correct outlet (HQ) and click Select | Select Branch window |
| 9–10 | Navigate to Listing > Transfer Note List | Main navigation |
| 11 | Filter by Transfer Type: Auto Return, Status: Confirmed, and refresh | Transfer Note List |
| 12 | Double-click the Auto Return record to open it | Transfer Note List |
| 13 | Click Receive to complete the transfer-back | Auto Return Transfer Note detail |
Key point: The Auto Return transfer note will always have a different Transfer ID from the original transfer note. The system generates it automatically when Direct Complete is triggered. The Transfer From and Transfer To outlets are also reversed — HQ becomes the sender, and the outlet becomes the receiver.
Overall Key Takeaways
- Confirm is final — across every flow, once a Transfer Note (or its item lines) is confirmed, it cannot be edited. Always double-check items/quantities while status is still Saved.
- Receive is only possible once Shipped — the Receive button doesn't appear until the sending branch has shipped the note; Completed means it's already been fully received.
- Receive Quantity is always editable and yellow-highlighted — it's the one field you should actively verify against physical stock before confirming a receipt, on every receiving flow (Sections 2, 3, 4, 5).
- The Transfer Request checkbox is what turns a Transfer Note into a request rather than an actual dispatch — required when an outlet is asking HQ for stock (Section 3, Phase 1).
- Auto Return notes always get a new Transfer ID and reverse the Transfer From/To direction relative to the original note (Section 5).
- Confirming a receipt updates branch inventory automatically — no manual stock adjustment is needed in any flow.
FAQ
3. Does cancelling a transfer note automatically returns the items? Do users need to do stock return after cancelling a transfer note?
- There is one exception case for Transfer Note cancellation is when the transfer note involved Sold Serial Item, Xilnex will block the cancellation of transfer note in this scenario. It is the expected behaviour when the Serial Item in the related transfer note is already moved.
7. What happens to Transfer Note Bill Status if the linked sales invoice is cancelled?
9. Can we add sale price in the transfer note list? Can we add option in filtering list in transfer note list?
Answer: There is no price column from item in Transfer Note list for now which transfer note list is by Document level, in stead there are Unit Price column in "Transfer Note List (by Item)" which indicate the price value using by the item in the Transfer Note. Will recommend to refer to the column. There is existing Filtering option in the Transfer Note List and Transfer Note List by Item, user can key in value to filter by specific column.
10. Does this step to press Post to Sales need to manual perform everytime create transfer note?
Answer: The billable status will be check with the outlet ownership info between Transfer From and Transfer To outlets, user can press the Post To Sales button to create sales invoice when both outlet ownership is different. There is setting to automated the processes which located in System Configuration > Item > Current Outlet > Transfer Note: "Auto creeate sales invoice upon confirmed" which will help user to auto generate a sales invoice when the transfer note is being confirmed.