Permission Approvals in Xilnex for Lark
Overview
Permission Approvals connect Xilnex POS to Lark Approval. When a cashier attempts an action they don't have permission for (like cancelling a sale), they can send a request straight to a manager's Lark app instead of needing a supervisor physically at the terminal.
This article covers both setup (for IT administrators) and what a cashier sees when requesting an approval.
Setting Up Permission Approvals

Before you begin
- Your Webhook Token must already be verified. This is what lets Lark send approval decisions back to Xilnex. See the Webhook Token section in [How to Connect Xilnex for Lark] if you haven't set this up yet.
- You'll also need admin access in Lark to create an approval form in Lark.
Step 1: Open Permission Approvals
1. Go to Xilnex Portal → Plugins → Xilnex for Lark → Approvals.
2. The Permission Approvals tab is selected by default.
3. Check the status in the top right. If it shows Setup required, continue with the steps below. If your Webhook Token isn't verified yet, configure the token first.
Step 2: Create Your Lark Approval Form
1. Click How to set up in Lark for the in-page guide.
2. Go to Lark Approval. You'll need admin access in Lark for this step.
3. Create a new custom Lark Approval form.
4. Give the lark approval form a name and fill in the necessary details.
5. In the form design, add the approval fields and contacts, following the in-page guide.
6. In the process design, click the approver node and set Approvers as the Contacts in the form
7. Save then Publish the form.
Step 3: Connect the Form to Portal
1. You will be redirected back to the list of Approvals, open your published form by clicking the pencil icon.
2. Copy the full URL from your browser's address bar.
3. Back in Portal, paste the URL into the setup field and click Connect.
4. Your Template ID is detected automatically from the URL, so there's nothing to copy separately.
Once connected, the status changes to Enabled, and you'll see Lark Approval Form (showing the connected Template ID)
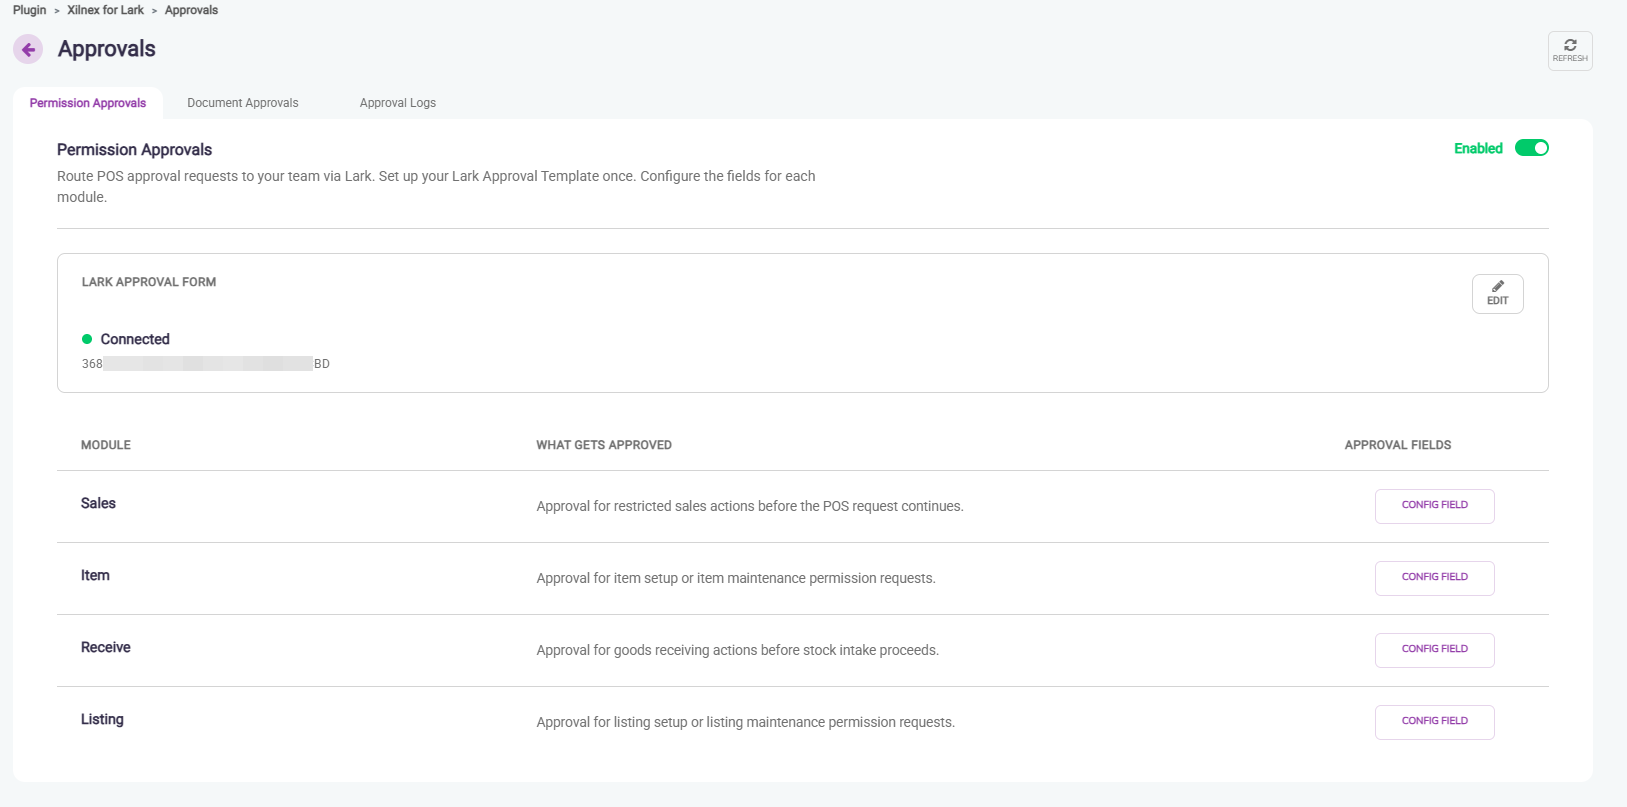
Step 4: Configure Approval Fields per Module
Every module that currently has permission escalation shows up in the table with a Config Field button.
1. Click Config Field next to a module (e.g., Sales).
2. Always On fields are locked and always included. Optional fields can be checked or unchecked.
3. Click Save.
Repeat for each module you want to enable Lark approval for.

Only modules that already support permission escalation in Xilnex appear here. As more modules get escalation support, they'll show up in this table too.
Step 5: Notify Your Approvers
Let the people you added as approvers know they'll start receiving Lark approval notifications. They'll need to act on these from their Lark app when a cashier sends a request.
Approvals follow the user's role and permissions as configured in Xilnex. Each person only sees and acts on the approvals their access level allows — so approval routing stays consistent with the roles you've already set up in the system.
Using Lark Approval at POS
This requires the setup above to already be done for your outlet.
Requesting an Approval
1. Attempt the action at POS (e.g., Cancel Sales).
2. A popup shows you don't have permission for this action.
3. Fill in the Reason field
4. Click Request Lark Approval.
5. The terminal freezes and waits for your approver to respond.
A Cancel button stays available the whole time the terminal is frozen, so you're never stuck waiting with no way out.
The POS freezes for 90 seconds only.
What Happens Next
The assinged approver will receive a Lark Notification Bot
If the approver approves or rejects:
You'll see the outcome on screen right away, and can proceed accordingly.
If the approver doesn't respond:
The POS automatically revokes the request after 90 seconds. From there you can cancel and try again, submit a new Lark request, or fall back to having a supervisor enter their PIN at the terminal in person.
Cancel the Lark Request
1. Click Cancel on the frozen screen
2. You will be returned back to the sales page.
3. Submit a new Lark request or use the manual PIN entry fallback.
Once cancelled, the approver can no longer act on that request. Click Request Lark Approval to have a new request sent to the approver.
Good to know
- The POS waits for 90 seconds only before revoking the request to lark. The Cancel button is always visible to cancel the lark request which unfreezes the POS.
- When POS is offline, Lark request is not available.
- To review approval history, see [Approval Hub Overview in Xilnex for Lark].