How to create Purchase Order
Overview
This guide walks you through the process of creating a Purchase Order (PO) in the Xilnex Inventory module. A Purchase Order is used to formally record items you intend to purchase from a supplier, including quantities and unit costs. Once saved, the PO can be used as the basis for receiving goods via a Goods Receive Note (GRN).
Follow each step in order. No prior training is required.
Steps
Step 1 — Navigate to Purchase Order
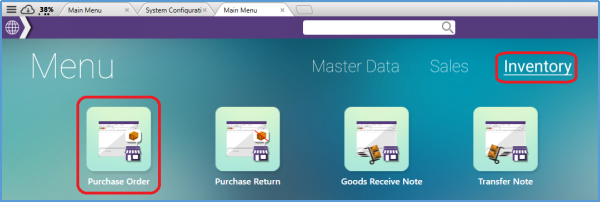
- From the main menu, click on Inventory in the top navigation bar.
- On the Inventory module screen, click the Purchase Order tile.
Step 2 — Create a New Purchase Order
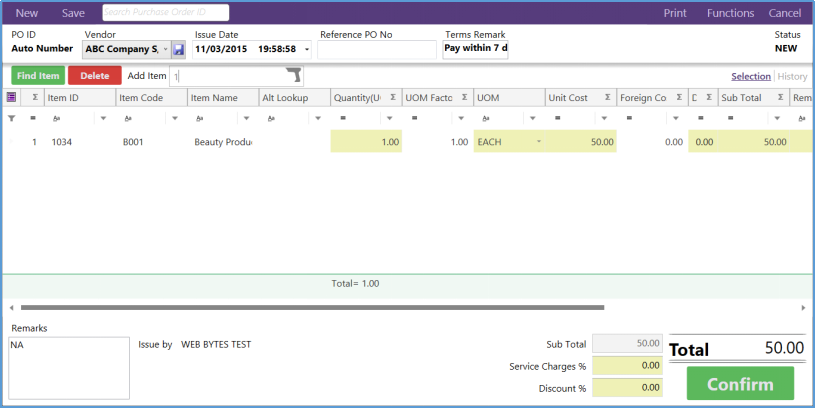
- On the Purchase Order list screen, click New in the top action bar to open a blank Purchase Order form.
The form opens with a purple header bar containing the actions: New, Save, a search field for Purchase Order ID, Print, Functions, and Cancel. The PO ID field is set to Auto Number, and the Status shows NEW.
Step 3 — Select a Vendor (Supplier)
- In the Vendor field at the top of the form, click the dropdown and select the supplier you are ordering from (e.g., ABC Company S.).
Once a vendor is selected, the Issue Date and Terms Remark fields are populated automatically based on the supplier's default settings (e.g., Terms Remark: "Pay within 7 d").
Step 4 — Fill In Additional Header Information (Optional)
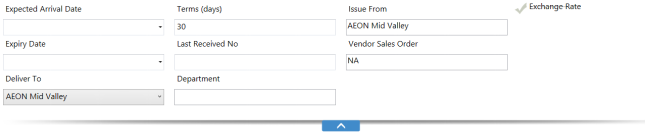
To enter additional order details, click on the blank white space below the header fields (or the collapse/expand arrow at the bottom of the header section). This expands the additional fields panel, which includes:
- Expected Arrival Date — the date you expect the goods to arrive.
- Expiry Date — if applicable, the expiry date associated with this order.
- Terms (days) — payment terms in number of days (e.g., 30 days); auto-filled from supplier defaults.
- Last Received No — reference to the last received document, if any.
- Deliver To — the outlet or location the goods should be delivered to (e.g., AEON Mid Valley). Select from the dropdown.
- Department — the department this order is assigned to (optional).
- Issue From — the issuing outlet or location (e.g., AEON Mid Valley); auto-filled.
- Vendor Sales Order — the vendor's own reference number, if provided (defaults to NA).
- Exchange Rate — tick this if a foreign currency exchange rate needs to be applied.
These fields are optional and depend on whether your management requires this level of tracking. Fill in what is relevant to your workflow.
Step 5 — Add Items to the Purchase Order
You can add items to the PO in two ways: by scanning/typing an item barcode directly, or by using the Find Item search tool.
Option A — Add Item by Barcode (Scan or Type)
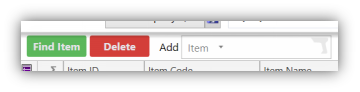
- In the Add Item field in the toolbar, type or scan the item barcode directly. The item will be added to the line item grid automatically.
Option B — Add Item Using Find Item
-
Click the green Find Item button in the toolbar. The Find Item panel opens.
- Browse or search for the item in the list. Tick the checkbox next to each item you want to add to the order. You can select multiple items at once.
For each selected item, enter the Input Qty (quantity to order) and Input Cost/Price directly in the Find Item panel's input columns.
The Find Item panel shows columns: Select (checkbox), Input Qty, Input Cost/Price, Item ID, Item Code, Item Name, and Alt Lookup. Rows highlighted in yellow indicate items currently selected.
Once you have selected all required items and entered their quantities, click the Add Item button (green) at the top of the Find Item panel. The selected items will be added to the PO line item grid.
Click Cancel if you want to close the Find Item panel without adding items.
Option C - Add item by Purchase Order ID
In the Add dropdown next to the item list, you can switch between item lookup modes. Click the dropdown arrow and select PO to filter the item list to items relevant to Purchase Orders.
- Update the quantity on the list.
Step 6 — Set Quantity and Unit Cost Per Line Item
In the PO line item grid, locate the row for each added item and verify or update:
- Quantity (UOM) — the number of units being ordered.
- Unit Cost — the cost per unit in local currency.
To edit these values directly, click on the cell in the grid and type the new value.
Alternatively, double-click a line item row to open the QuantityEditor popup. The popup displays:
- Item Name and Item Code for confirmation.
- All Outlet Total Qty — total stock across all outlets.
- Current Outlet Qty — current stock at the selected outlet.
- UOM — unit of measurement (e.g., ROLL, EACH).
- Quantity — enter the quantity to order.
- Cost — enter the unit cost.
- Total Cost — calculated automatically (Quantity x Cost).
- FOC Quantity — Free of Charge quantity, if applicable.
-
After entering the values in the QuantityEditor, click OK to confirm and close the popup.
The Sub Total for the line item will update automatically in the grid. The overall Total is shown at the bottom right of the screen.
Step 7 — Add a Remark (Optional)
- At the bottom left of the Purchase Order form, there is a Remarks text box. Type any internal reference notes or remarks you want to attach to this PO (e.g., special handling instructions, reference numbers).
This field is optional. Use it to record context that is not captured elsewhere in the form.
Step 8 — Save or Confirm the Purchase Order
- When you are satisfied with all line items, quantities, costs, and remarks:
- Click Save in the top action bar to save the PO in NEW status for further editing later.
- Click the green Confirm button at the bottom right to finalise and confirm the Purchase Order. Once confirmed, the PO status will change from NEW to confirmed and it cannot be freely edited.
The bottom summary section shows Sub Total, Service Charges %, Discount %, and the final Total amount. Review these before clicking Confirm.
Important: If you only want to draft the PO and review it before committing, use Save. Only click Confirm when the order is finalised and ready to be sent to the supplier or used to raise a Goods Receive Note.
Summary
| Step | Action |
|---|---|
| 1 | Navigate to Inventory > Purchase Order |
| 2 | Click New to open a blank PO form |
| 3 | Select the Vendor (supplier) |
| 4 | Fill in optional header fields (ETA, Deliver To, Department, etc.) |
| 5 | Add items via barcode scan or Find Item |
| 6 | Set Quantity and Unit Cost per line item |
| 7 | Add a Remark if needed |
| 8 | Click Save to draft or Confirm to finalise |
FAQ
2. Why my new warehouse unable to send out the email for purchase orders?
- check the Xilnex Email configuration whether is setting up correctly
Answer: Yes, user can perform partially receiving by key in quantity received while doing the Purchase Receive process in Goods Receive Note module, user may also use Force Complete to update the status of Purchase Order to complete.