Basic - How to Create a New Item Code
How to Create a New Item Code
An Item Code is the master record for every product you sell or stock in Xilnex. Creating a complete item record ensures accurate sales, purchasing, inventory tracking, and reporting across all your locations. The system can auto-generate the code for you based on a grouping prefix, or you can type your own custom code.
Navigation
From the main menu, go to: Master Data > New Item
The Item screen opens with a left-side tab panel for each section of the item record.
Step 1 — Open a New Item Record
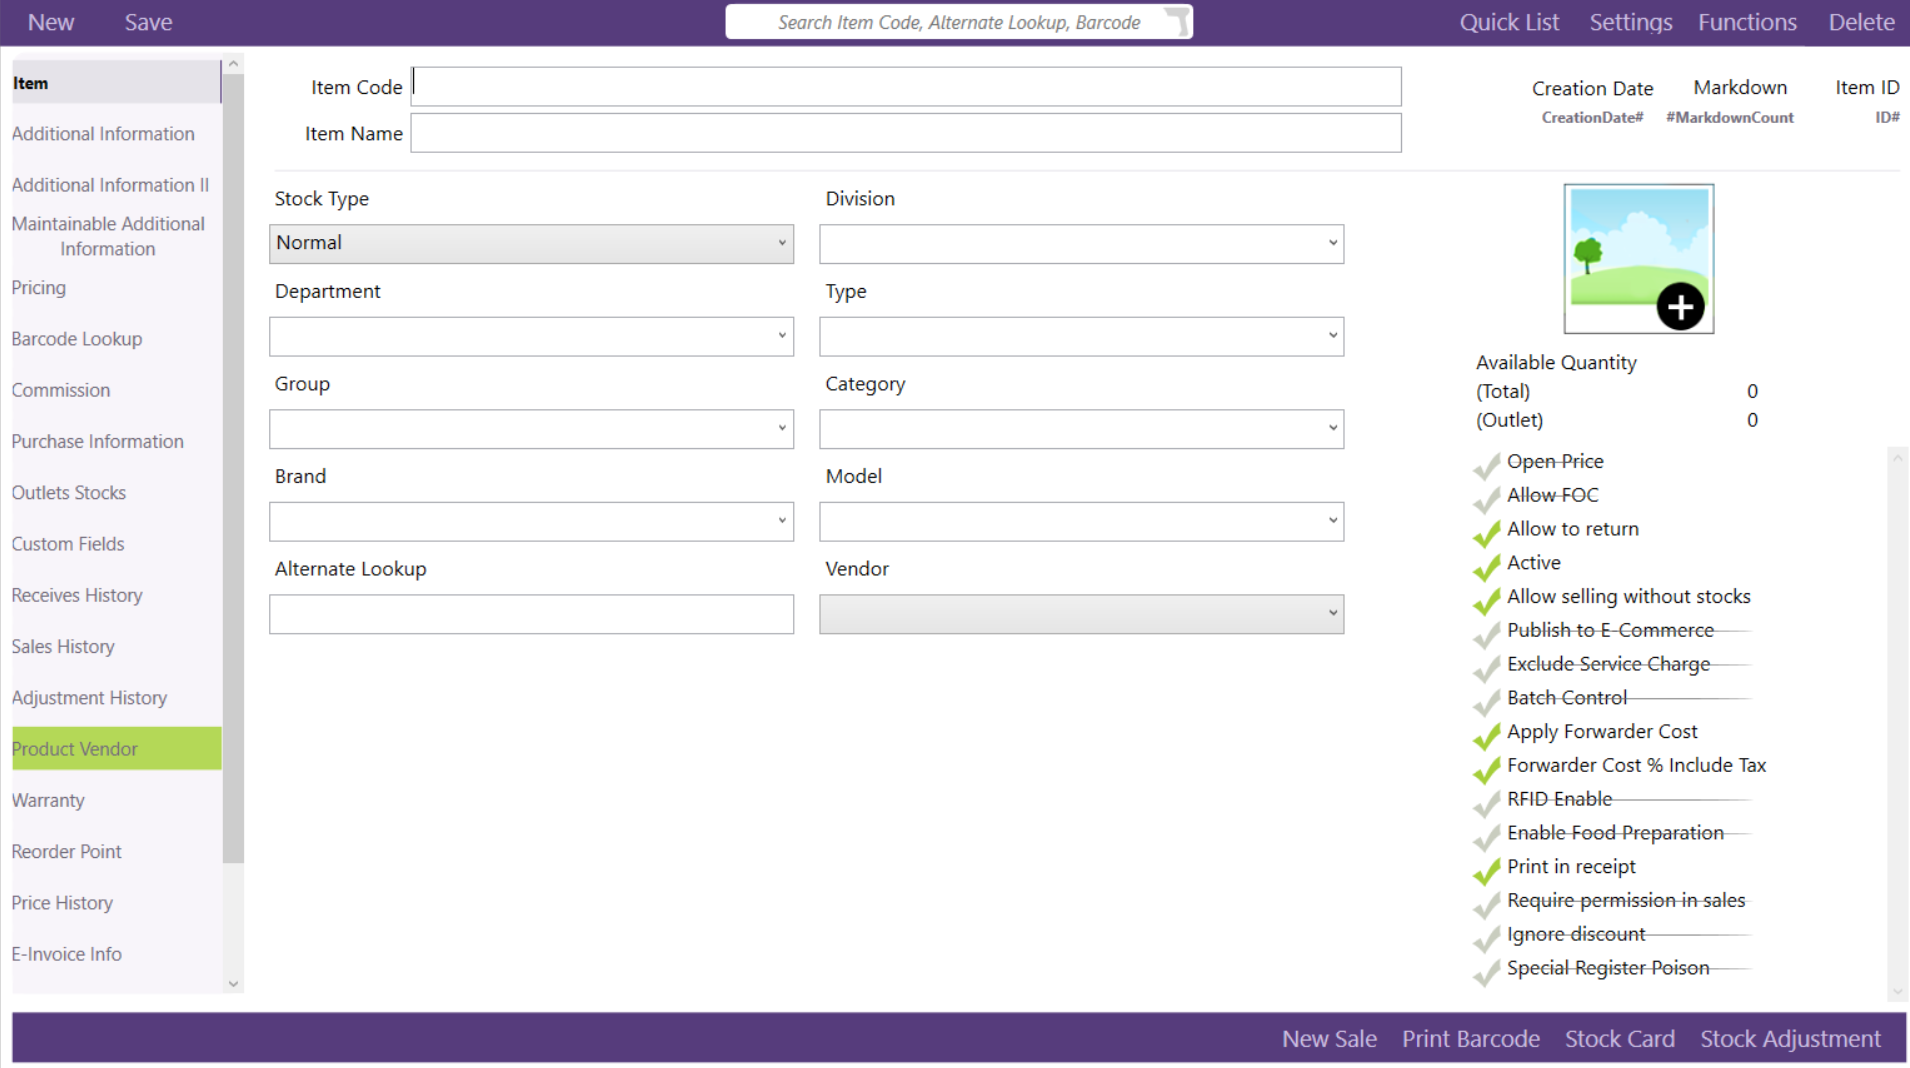
- On the top toolbar, click New.
- A blank item form appears. The Item tab is selected by default on the left panel.
Step 2 — Enter the Item Code and Item Name
| Field | Description |
|---|---|
| Item Code | A unique identifier for the product. Type your own code, or leave it blank and select a Group to let the system auto-generate it (requires auto-generate setting to be configured first). |
| Item Name | The product name that will appear on receipts, invoices, and reports. |
- In the Item Code field, type a code (e.g.,
SHOE-001) or leave it blank for auto-generation. - In the Item Name field, type the full product name (e.g.,
Running Shoe Size 10).
Auto-generate: If you want the system to create the code automatically, configure in System Configuration > Item > All Outlets > "Barcode or item code generator" and select the value to auto generate and select the value before saving. The "Auto generate" label is shown beside the Item Code field as a reminder.
Step 3 — Select the Stock Type
Below the Item Code and Item Name fields, locate the Stock Type dropdown. Click it to see the available types:
| Stock Type | When to Use |
|---|---|
| Normal | Standard products sold by quantity (default). |
| Serialized | Items tracked individually by serial number (e.g., electronics). |
| Weighted | Items sold by weight (e.g., deli items, produce). |
| Matrix | Items with variants such as size and colour (e.g., clothing). |
| Service Based | Non-physical services billed to the customer. |
| Warranty | Warranty items or service plans. |
- Click the Stock Type dropdown.
- Select the type that matches the product.
For most retail goods, select Normal.
Step 4 — Complete the Item Grouping and Classification Fields
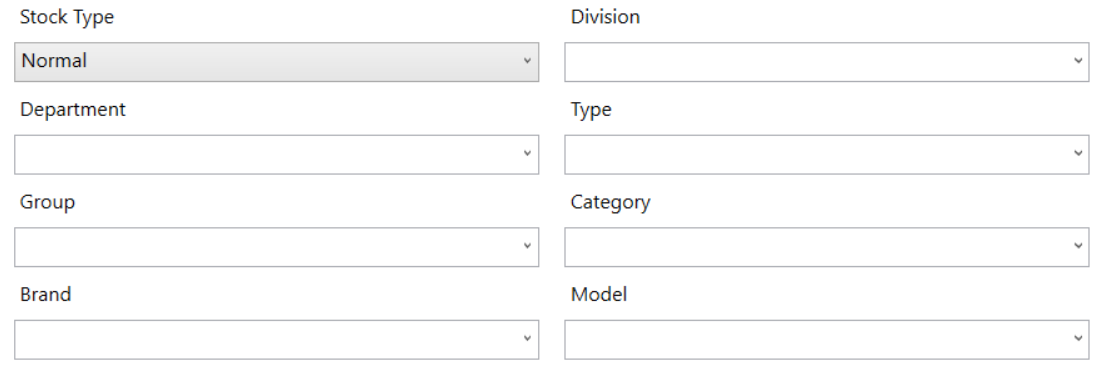
These fields categories the item for reporting and filtering purposes. All grouping fields are dropdowns populated from your master data setup.
| Field | Purpose | Example Values |
|---|---|---|
| Division | Broad business division or ownership type. | Consignment, Outright, Inbound |
| Item Department | The department that carries this item. | Ladies Wear, Hyper, Supermarket, Electrical |
| Type | Sub-classification within a department. | Chiffon, Satin, Leather, Imported |
| Group | Main item grouping for reporting and code auto-generation. | Upper Wear, Lower Wear, Footwear |
| Category | Finer classification within the group. | Shoes, T-shirt, Blouse, Slipper |
| Brand | Manufacturer or brand name. | D&G, Edwin |
| Model | Product model reference. | Enter model number or name |
- Click each dropdown and select the appropriate value.
- At minimum, select value for field configured if you want the system to auto-generate the Item Code.
Step 5 — Fill in Alternate Lookup and Vendor
| Field | Purpose |
|---|---|
| Alternate Lookup | An old or alternative stock code for this item. Once entered, staff can search by this code during sales. Useful when migrating from a previous system. |
| Vendor | Select the primary supplier for this item from the dropdown list. |
- Type an alternate code in the Alternate Lookup field if applicable.
- Click the Vendor dropdown and select the main supplier.
Step 6 — Upload a Product Image (Optional)
On the right side of the Item tab, there is a product image placeholder with a + (plus) button.
- Click the + button on the image placeholder.
- Browse to and select the product image file.
- The image will display in the placeholder.
Uploading a product image is optional but recommended for visual identification at point of sale.
Step 7 — Review Item Flags (Right-Side Panel)
On the right side of the Item tab, below the image, you will see a set of checkboxes. These control behaviour for this specific item:
| Flag | Default | Meaning |
|---|---|---|
| Open Price | Off | If checked, staff can manually update the price of open price item at point of sale. |
| Allow FOC | Off | If checked, this item can be issued as free-of-charge. |
| Allow to Return | On | If checked, customers can return this item. |
| Active | On | If unchecked, the item will be hidden from sales screens. |
| Allow Selling Without Stocks | On | If checked, the item can be sold even when stock is zero. |
| Publish to E-Commerce | On | If checked, the item is listed on your connected e-commerce platform. |
Review and adjust each flag to match your business rules for this product.
The panel also shows Available Quantity — Total and Outlet — which will display actual stock figures once goods have been received.
Step 8 — Additional Information Tab
Click Additional Information in the left panel to see supplementary product details.
| Field | Purpose |
|---|---|
| Description | Extended product description. |
| Attribute | Free-text attribute for additional classification. |
| Unit of Measure | The base unit in which this item is counted or sold (Min UOM). |
| Reorder Point | Stock level at which a purchase order should be triggered. |
| Size | Size information (e.g., S, M, L, XL). |
| Colour | Colour of the item. |
| Promotion Group | Assign this item to a promotion group for bulk discount rules. |
| Pack Quantity | Number of units in a pack (defaults to 1). |
| Created By | Read-only field populated automatically when the record is saved. |
- Fill in any fields that are relevant to this product.
- At minimum, enter the Unit of Measure (e.g.,
PCS,KG,BOX).
Step 9 — Pricing Tab
Click Pricing in the left panel to set selling prices.
The system supports 7 price tiers, allowing you to charge different prices to different customer groups or sales channels.
| Price Field | Purpose |
|---|---|
| 1. Sale Price | Standard retail selling price. |
| 2. Member Price | Discounted price for registered members. |
| 3. Wholesale Price | Price for wholesale buyers. |
| 4. Custom Price | Configurable price for a specific customer category. |
| 5. Suggested Price | Manufacturer's suggested retail price (MSRP) — for reference. |
| 6. Web Price | Price displayed on your e-commerce channel. |
| 7. Web Dealer Price | Dealer/reseller price for the web channel. |
| Custom Cost | Initial cost price. Used as a reference; updates automatically during goods receive based on your settings. |
| Discount Rate (%) | Default item-level discount percentage. |
| Active Price | Selects which price tier is the "active" default during sales. |
| Tax Rate (%) | Tax rate applied to this item. |
Margin and Markup figures (including AVG-cost variants) are calculated automatically based on the prices and costs you enter.
- Enter the Sale Price at minimum.
- Fill in additional tiers as needed.
- Set the Active Price dropdown to the tier used for normal sales (defaults to "Sale Price").
- The Tax Rate (%) will auto update based on tax code for the item.
Step 10 — Barcode Lookup Tab (Optional)
Click Barcode Lookup in the left panel to register additional barcodes for this item.
Use this when a single product has more than one barcode (e.g., different packaging or supplier barcodes).
- Type the barcode number in the Barcode Lookup input field.
- Click Add.
- The barcode appears in the list below.
- Repeat for each additional barcode.
- To remove a barcode, select it in the list and click Remove.
Step 11 — Commission Tab (Optional)
Click Commission in the left panel to configure sales commission for this item.
The commission section supports multiple commission tiers for different staff roles:
| Field | Purpose |
|---|---|
| Commission1 / Commission1 % | Fixed or percentage commission for sales staff tier 1. |
| Commission2 / Commission2 % | Commission for sales staff tier 2. |
| Commission3 / Commission3 % | Commission for sales staff tier 3. |
| Commission4 / Commission4 % | Commission for sales staff tier 4. |
| Driver Commission1 / Driver Commission1 % | Commission for delivery driver. |
| Installer Commission1 / Installer Commission1 % | Commission for installation staff. |
- Enter the applicable commission amount in the flat field (e.g.,
5.00) or the percentage in the%field (e.g.,2.50). - Leave at
0.00for staff roles that do not apply to this item.
Step 12 — Purchasing Information Tab (Optional)
Click Purchasing Information in the left panel to track product shelf life and purchasing availability.
| Field | Purpose |
|---|---|
| Expiry Calculation | Select how expiry is calculated: None, or a date-based method. |
| Shelf Life in Days | Number of days the product remains usable after receipt. |
| Day Before Expiry | Number of days before expiry to trigger an alert. |
| Purchase Unavailable Date From | Start of a period when this item cannot be purchased. |
| Purchase Unavailable Date To | End of the purchase blackout period. |
| Purchase Unavailable Remark | Reason or note for the unavailability period. |
- Set Expiry Calculation if this product has a shelf life.
- Enter Shelf Life in Days and Day Before Expiry as needed.
- Leave these fields blank if expiry tracking is not required for this item.
Step 13 — Outlet Stocks Tab (View Only)
Click Outlet Stocks in the left panel to see a summary of this item's stock balance across all your branches and locations.
Use the Location selector and press Select to filter location.
Step 14 — Receives History and Sales History Tabs (View Only)
- Receives History — Displays all goods received for this item to date. Read-only.
- Sales History — Displays all sales transactions that included this item. Read-only.
These tabs are informational and require no input when creating a new item.
Step 15 — Product Vendor Tab (Optional)
Click Product Vendor in the left panel to register additional suppliers for this item (beyond the primary vendor set in Step 5).
- Click the Vendor dropdown (showing e.g., "ABC Company S/B") and select an additional supplier.
- Click Add.
- The vendor appears in the list with columns: Vendor ID, Vendor Name, Vendor Identification, Account No, Vendor Item Code.
- Click Delete to remove a vendor from the list.
Step 16 — Unit of Measurement Tab (Optional)
Click Unit of Measurement in the left panel to check multiple units of measure for this item (e.g., sell by PCS but purchase by BOX of 12).
Configure multi-UOM here if the item is bought in bulk but sold individually.
Step 17 — Warranty Tab (Optional)
Click Warranty in the left panel to configure warranty terms for this item.
Option A — Simple Warranty:
| Field | Purpose |
|---|---|
| Warranty Group | Dropdown — assign this item to an existing warranty group. |
| Warranty Month | Number of months the warranty is valid. |
| Warranty Serial No Prefix | A text prefix added to generated warranty serial numbers. |
Option B — Warranty Group Linkage:
- Select a Warranty Group from the dropdown.
- Click Add — the group appears in the list below.
- On the right, set:
- Default Warranty Item — the default warranty service item linked to this group.
- Default Warranty Month(s) — standard warranty duration.
- Max Warranty Month(s) — maximum allowed warranty period.
- Click Remove to unlink a warranty group.
Step 18 — Save the Item Record
Once all required and optional fields are completed:
- Click Save on the top toolbar.
- The system assigns an Item ID and (if auto-generate was selected) an Item Code.
- A confirmation message appears.
If any mandatory field is missing, the system will highlight it and prevent saving.
Settings Menu (Top Toolbar)
The Settings button on the top toolbar provides additional display options for the item form:
| Option | Purpose |
|---|---|
| Show all custom fields | Reveals any custom fields configured for your business. |
| Branch Assortment | Controls which branches carry this item. |
| Show Location Setting | Displays location-specific pricing or stock settings inline. |
| Show Promotion Price | Shows promotion price fields on the Pricing tab. |
Footer Action Buttons
At the bottom of the Item screen, a purple toolbar provides quick actions without leaving the item record:
| Button | Action |
|---|---|
| New Sale | Creates a sales invoice containing only this item. |
| Barcode | Opens the barcode printing dialog for this item only. |
| Stock Management | Opens a stock adjustment entry pre-filtered to this item. |
| Stock Card | Displays the full stock movement history for this item. |
Summary — Required vs. Optional Fields
| Section | Fields | Required? |
|---|---|---|
| Item tab | Item Code, Item Name | Yes |
| Item tab | Stock Type | Yes (defaults to Normal) |
| Item tab | Group | Recommended (needed for auto-generate) |
| Item tab | Division, Department, Type, Category, Brand, Model | Optional but recommended for reporting |
| Item tab | Alternate Lookup | Optional |
| Item tab | Vendor | Recommended |
| Item tab | Product Image | Optional |
| Additional Information | Unit of Measure, Pack Quantity | Recommended |
| Pricing | Sale Price, Active Price, GST Rate | Yes |
| Pricing | Member, Wholesale, Custom, Web prices | Optional |
| Barcode Lookup | Additional barcodes | Optional |
| Commission | Commission tiers | Optional |
| Purchasing Information | Expiry / shelf life fields | Optional |
| Product Vendor | Additional suppliers | Optional |
| Warranty | Warranty group / months | Optional |